 Updated: March 10, 2018
Introduction
The purpose of these self-directed exercises is to provide participants hands-on experience, using the Oracle CASB Cloud Service trail account, to perform some key CASB use cases. Please ensure that you have completed the Oracle Security Cloud Day workshop pre-requisites before attempting this workshop.
The Workshop is divided into two sections. An initial overview section that focus on some of the low hanging use cases and an advance section that contains somewhat more advance subjects and exercises .
Objectives
The exercises will cover the following CASB features and concepts:
Advanced
- Sanctioned Application On-boarding & Configure Security Control Baseline.
- Reconfigure Security Control baseline
- Risk Events & User Risk
- Policy Configuration
Exercise 1. Sanctioned Application Onboarding
Overview:
In this session, you will be using the Oracle CASB Cloud Service UI to onboard a Salesforce Developer Account into your trial Oracle CASB Cloud Service tenant to be monitored. We will also configure CASB to update some of the security related settings in Salesforce to bring it in line with a configuration baselines we configured in CASB for Salesforce.
STEP 1: Prepare your assigned Salesforce Developer Account for this exercise by configuring an insecure password policy in Salesforce :
In a new Private Browsing Tab, sign in to your Salesforce account at secureoracleXXX-dev-ed.lightning.force.com , where XXX is your assigned user number.
You may run into the following issues
1. If you are unable to access the Salesforce login form due to an SSL warning in your browser, refer to the printed handout that you received, that contains your Salesforce account credentials and bypass the issue by replacing the hostname "login.saesforce.com" with the assigned host for your user in the format secureoracle__-dev-ed.lightning.force.com . Doing this will circumvent the proxy issues that leads to the SSL issue.
2. After you provide your credentials Salesforce may require you to provide a verification code at this point. Verification codes will be sent to the workshop leader's e-mail account and will be posted on the following https://cloudsecurityday.blogspot.com. You can browse the link and find the code for your assigned Salesforce User.
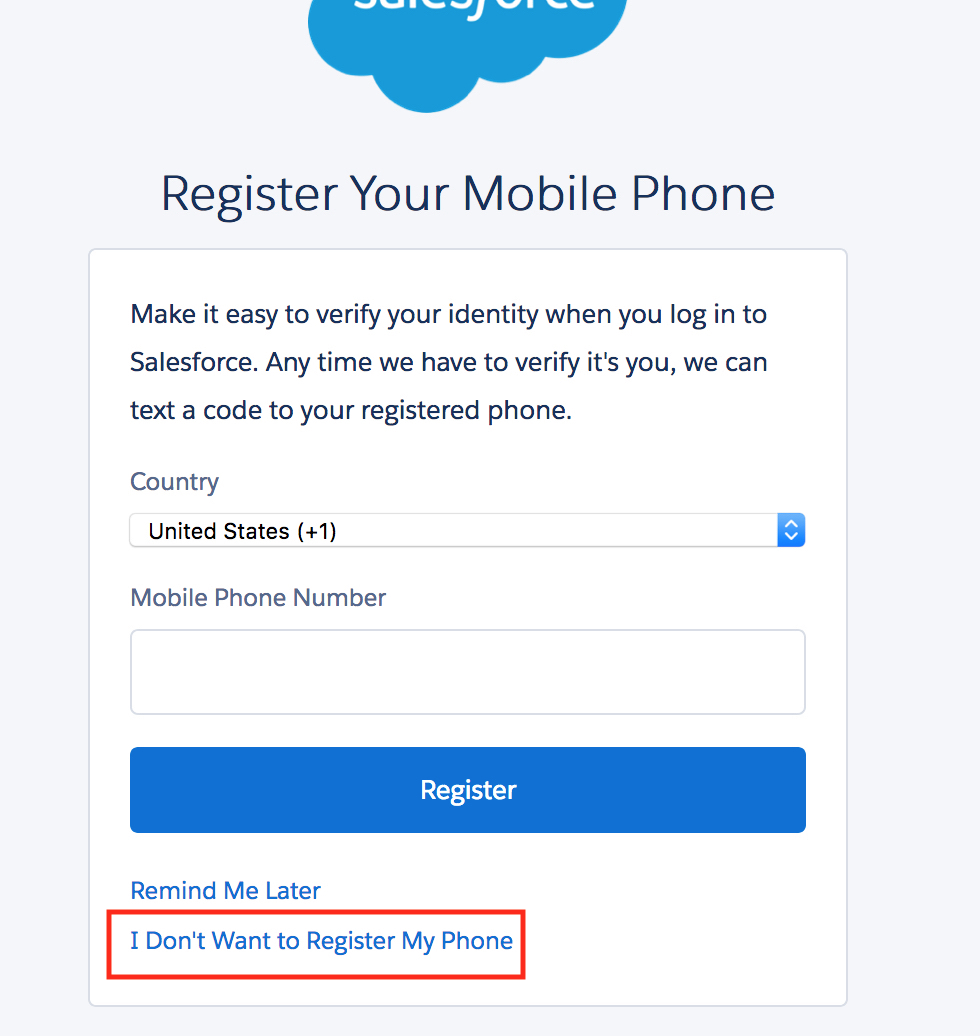
3. You may also be prompted to register your phone number with Salesforce . Select the "I Don't Want to Register My Phone" link
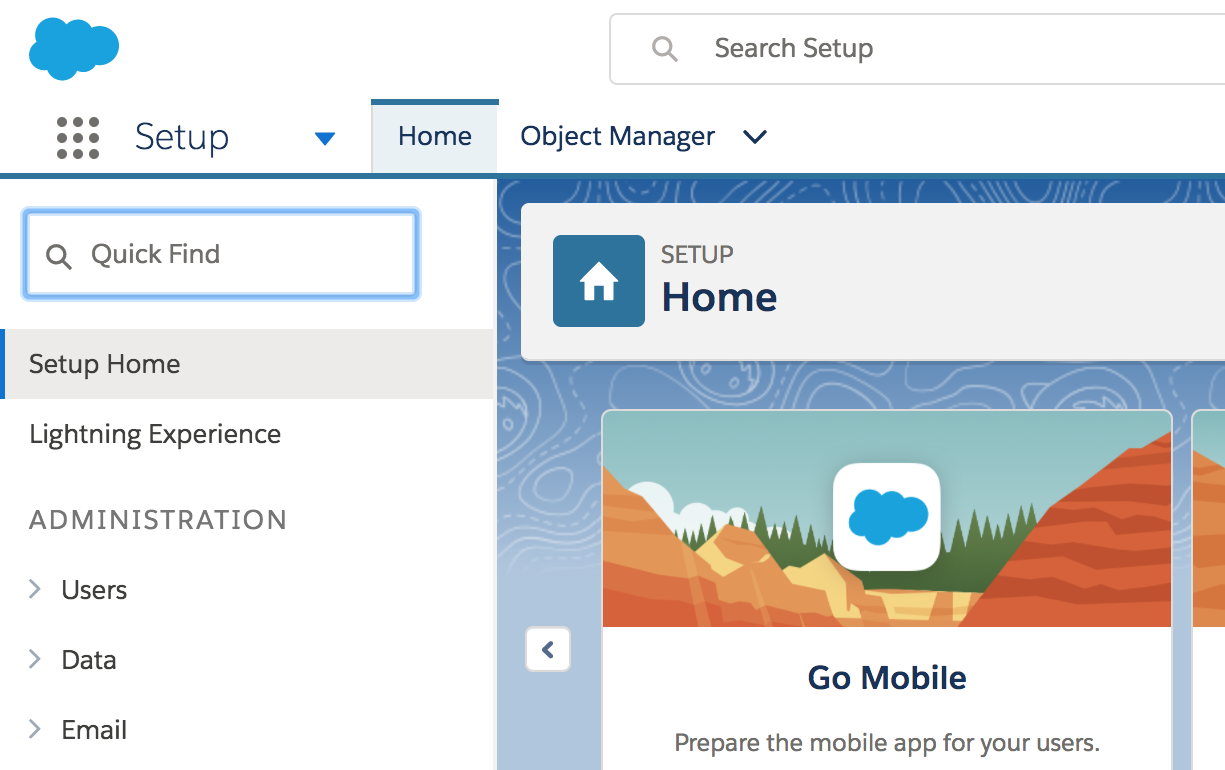
Once you’re in the Salesforce Setup UI Use the upper-left “Quick Find” box to search for Password Policies.
 Under “Password Policies” set user passwords to “Never Expire”.
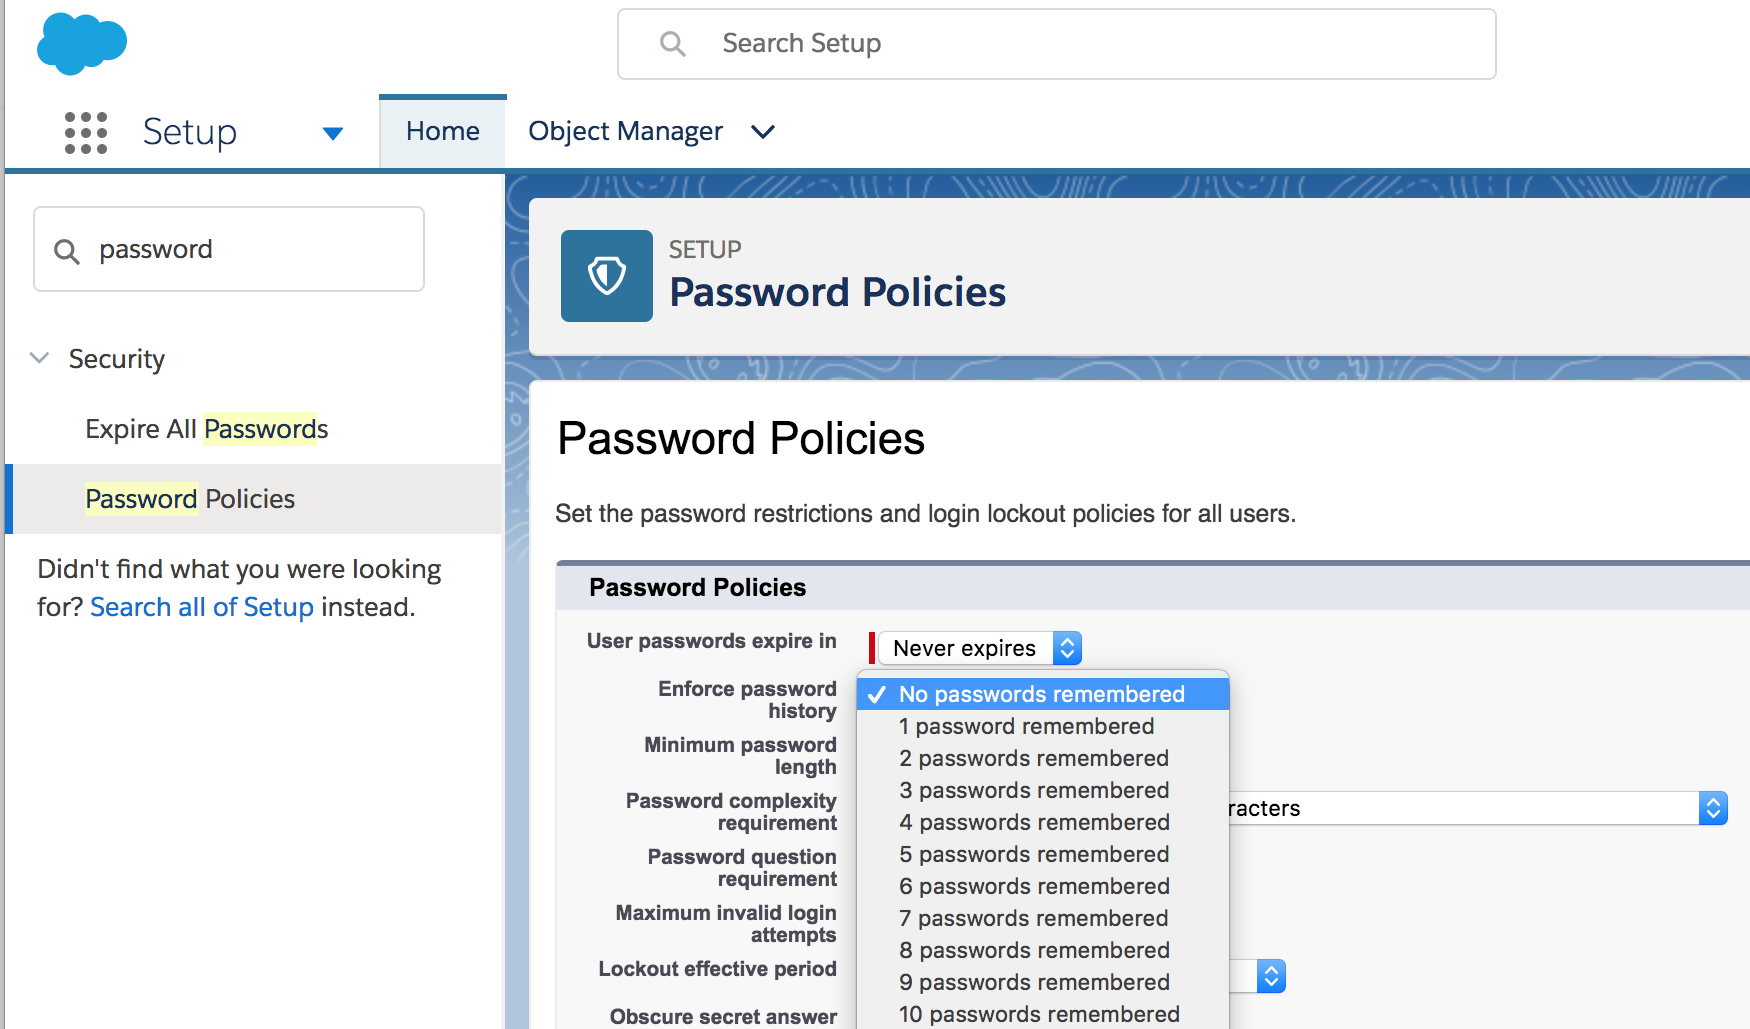
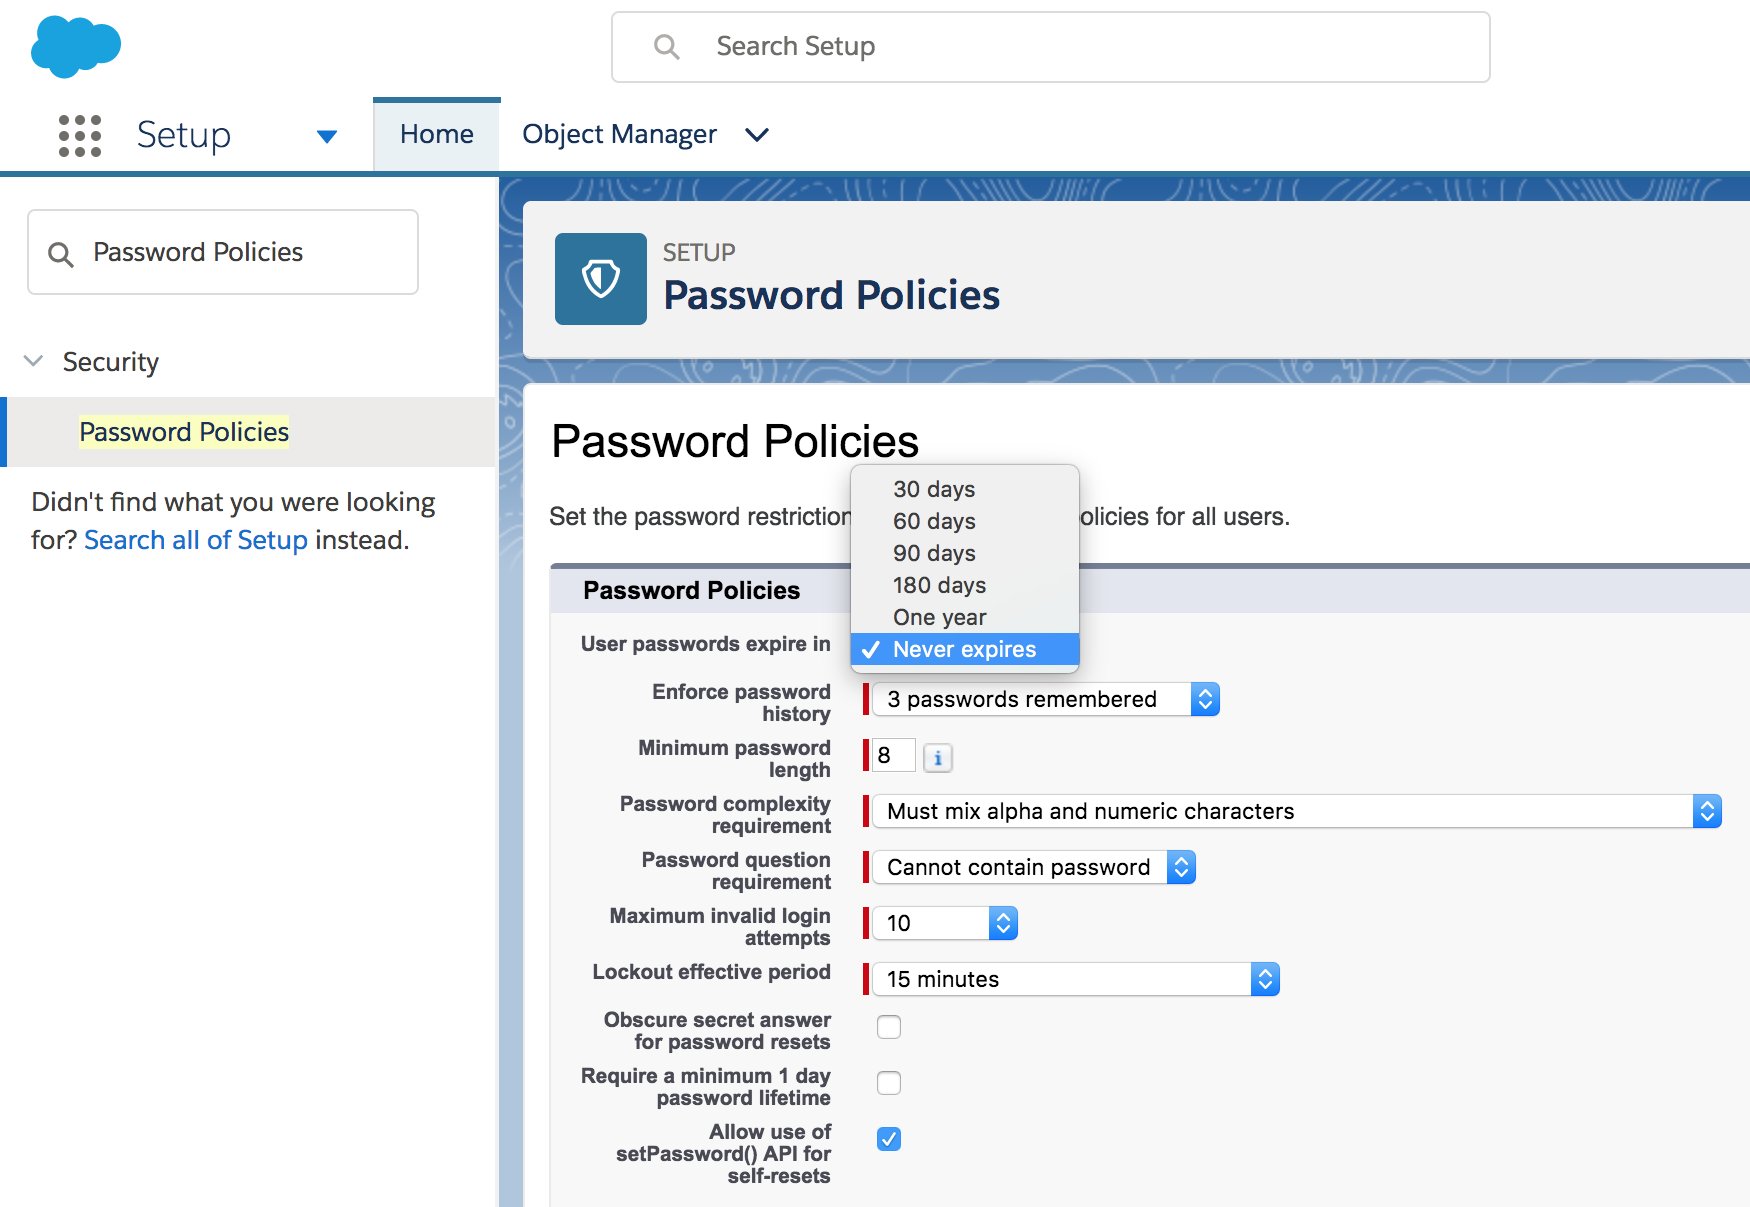 Under “Password Policies” choose to not enforce password history.
At the bottom of the “Password Policies” page, click the “Save” button.
STEP 2: Login to your Oracle Cloud Trial account and navigate to the Oracle CASB Cloud Service.
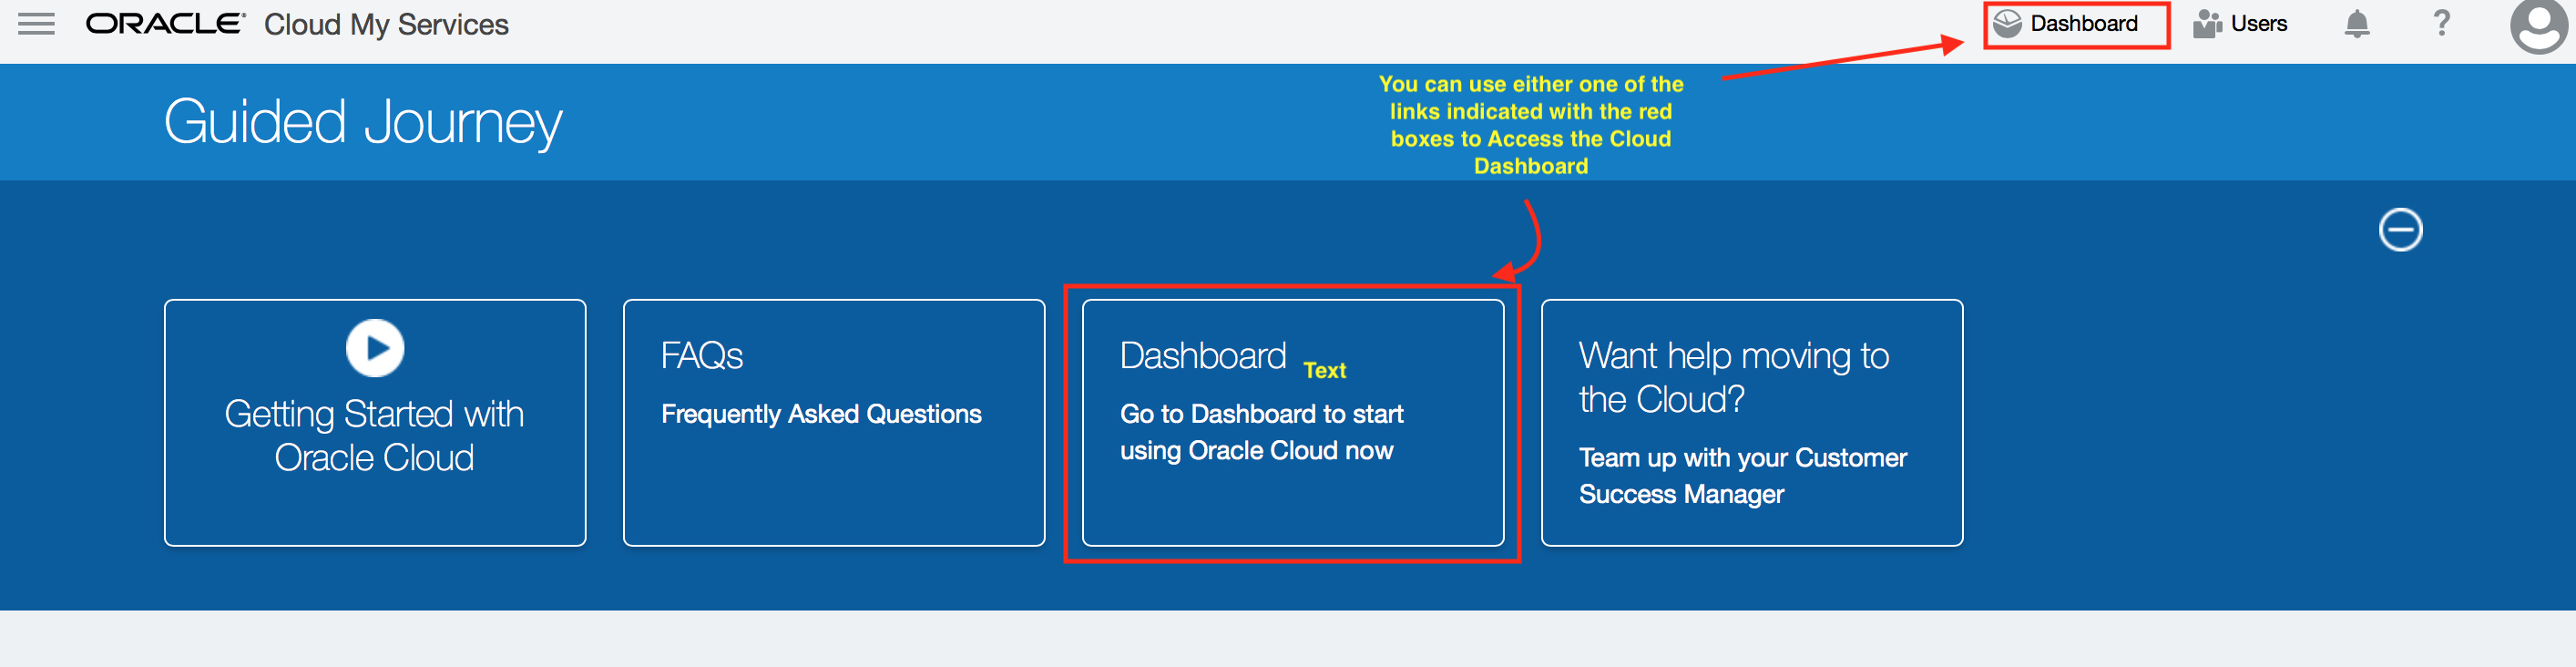
Start a new private browsing tab in your browser and log into your Oracle Cloud Trial Account with the appropriate credentials. Refer to the workshop re-requisites for instruction how to sign in to your Oracle Cloud trial account then go to the cloud “Dashboard” to access the trial CASB service.
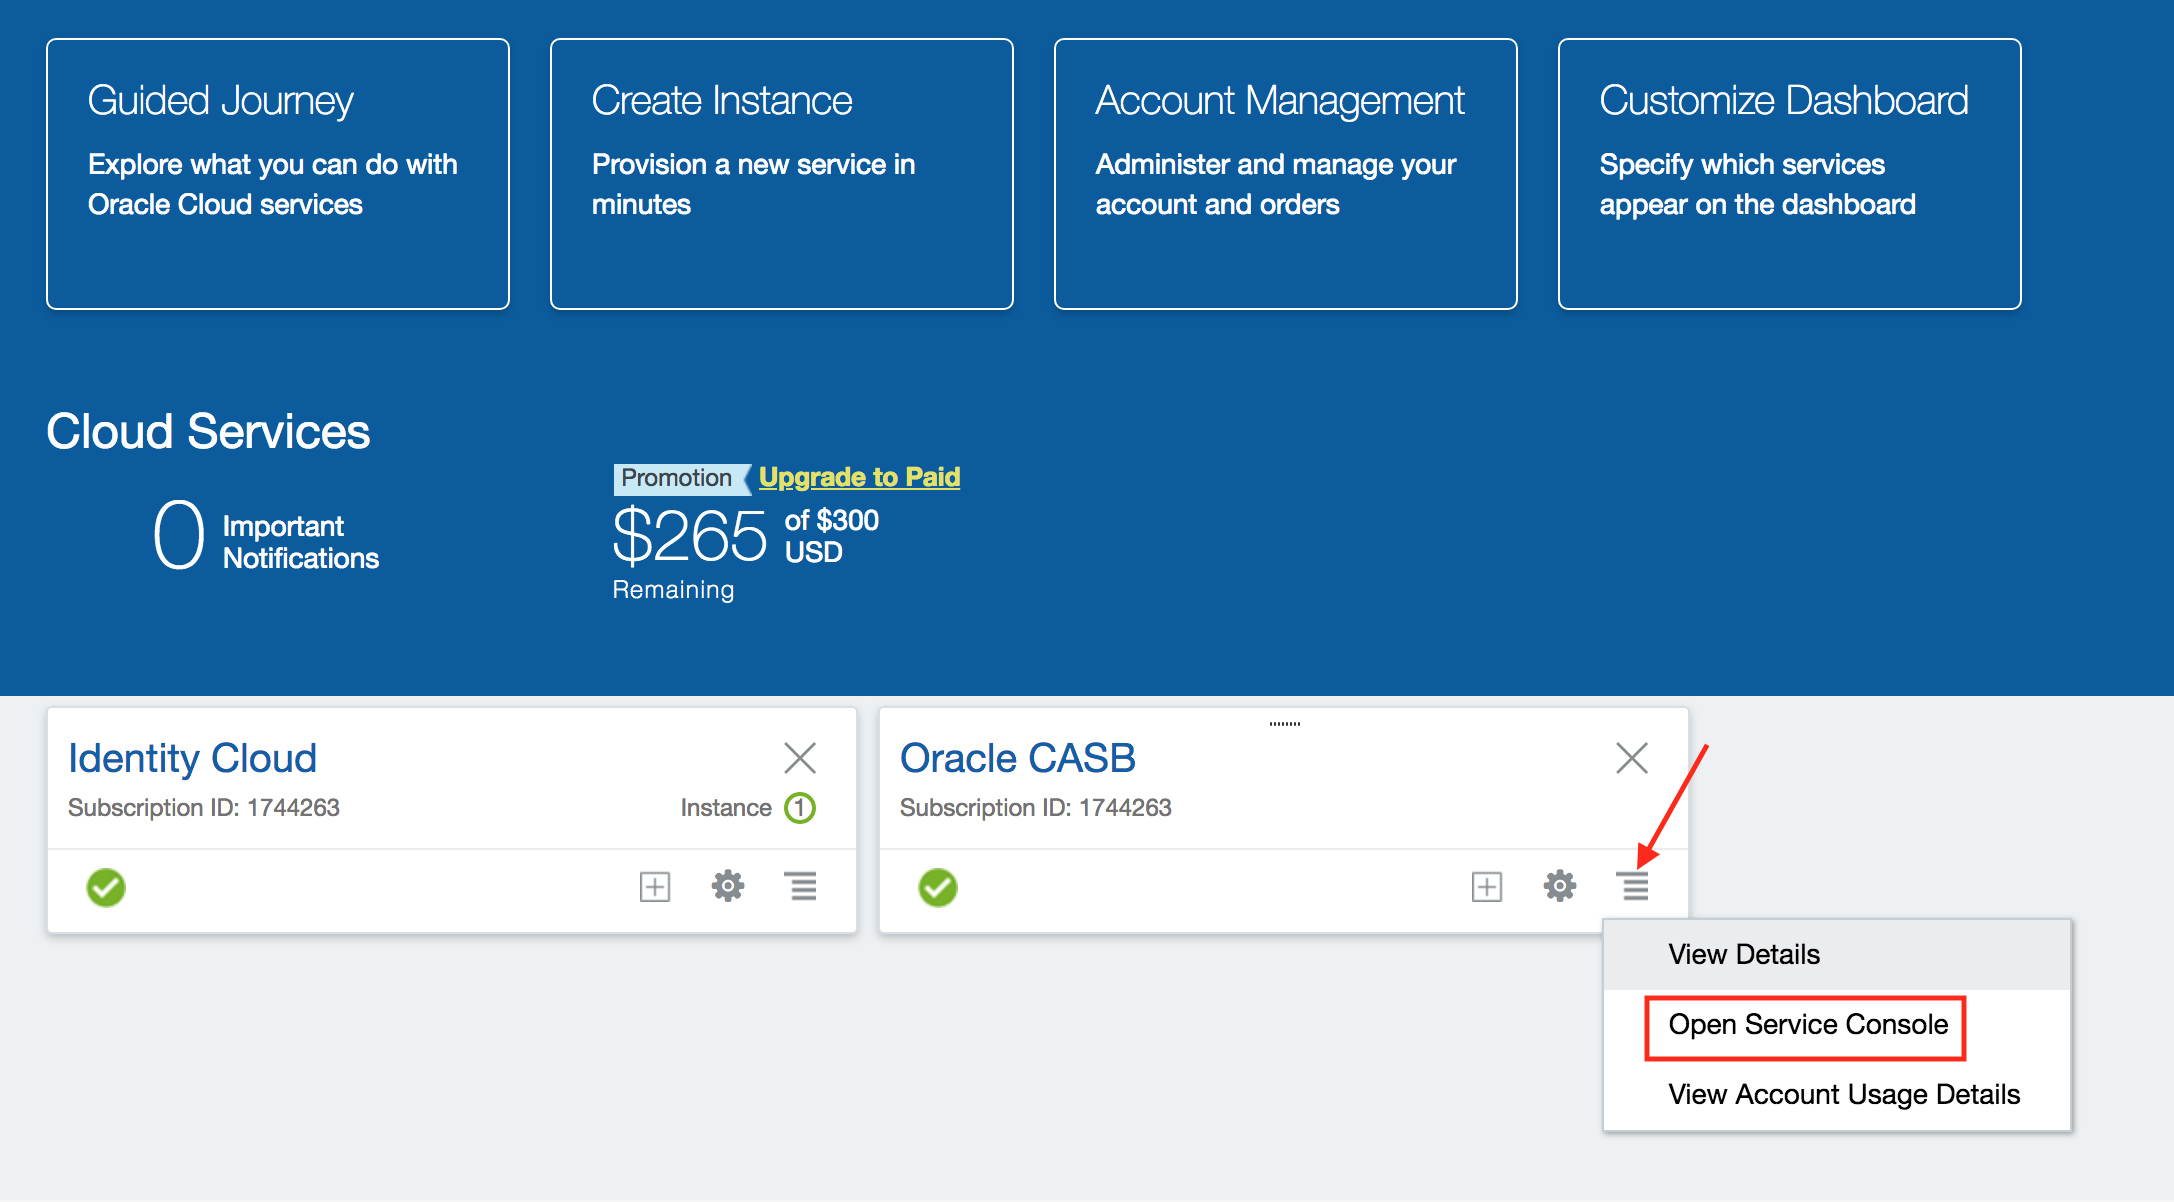
STEP 2: Choose to add a new Salesforce instance by clicking on the Salesforce icon, and click Next.
In a new CASB tenant, with no Applications integrated yet, you will start at the “Applications”” page with a collection of badges that represent various sanctioned applications that can be integrated with CASB .
![]()
STEP 3: Provide the name of the Salesforce instance.
CASB cloud service allows you to add multiple accounts/tenants of any given cloud service as long as each instance has a unique name. Enter a unique name for the instance for example: SFDC_Userx. Set all other values as shown in the following screen capture. Press the “Next” button to proceed to the next step of the “Register an app instance” wizard
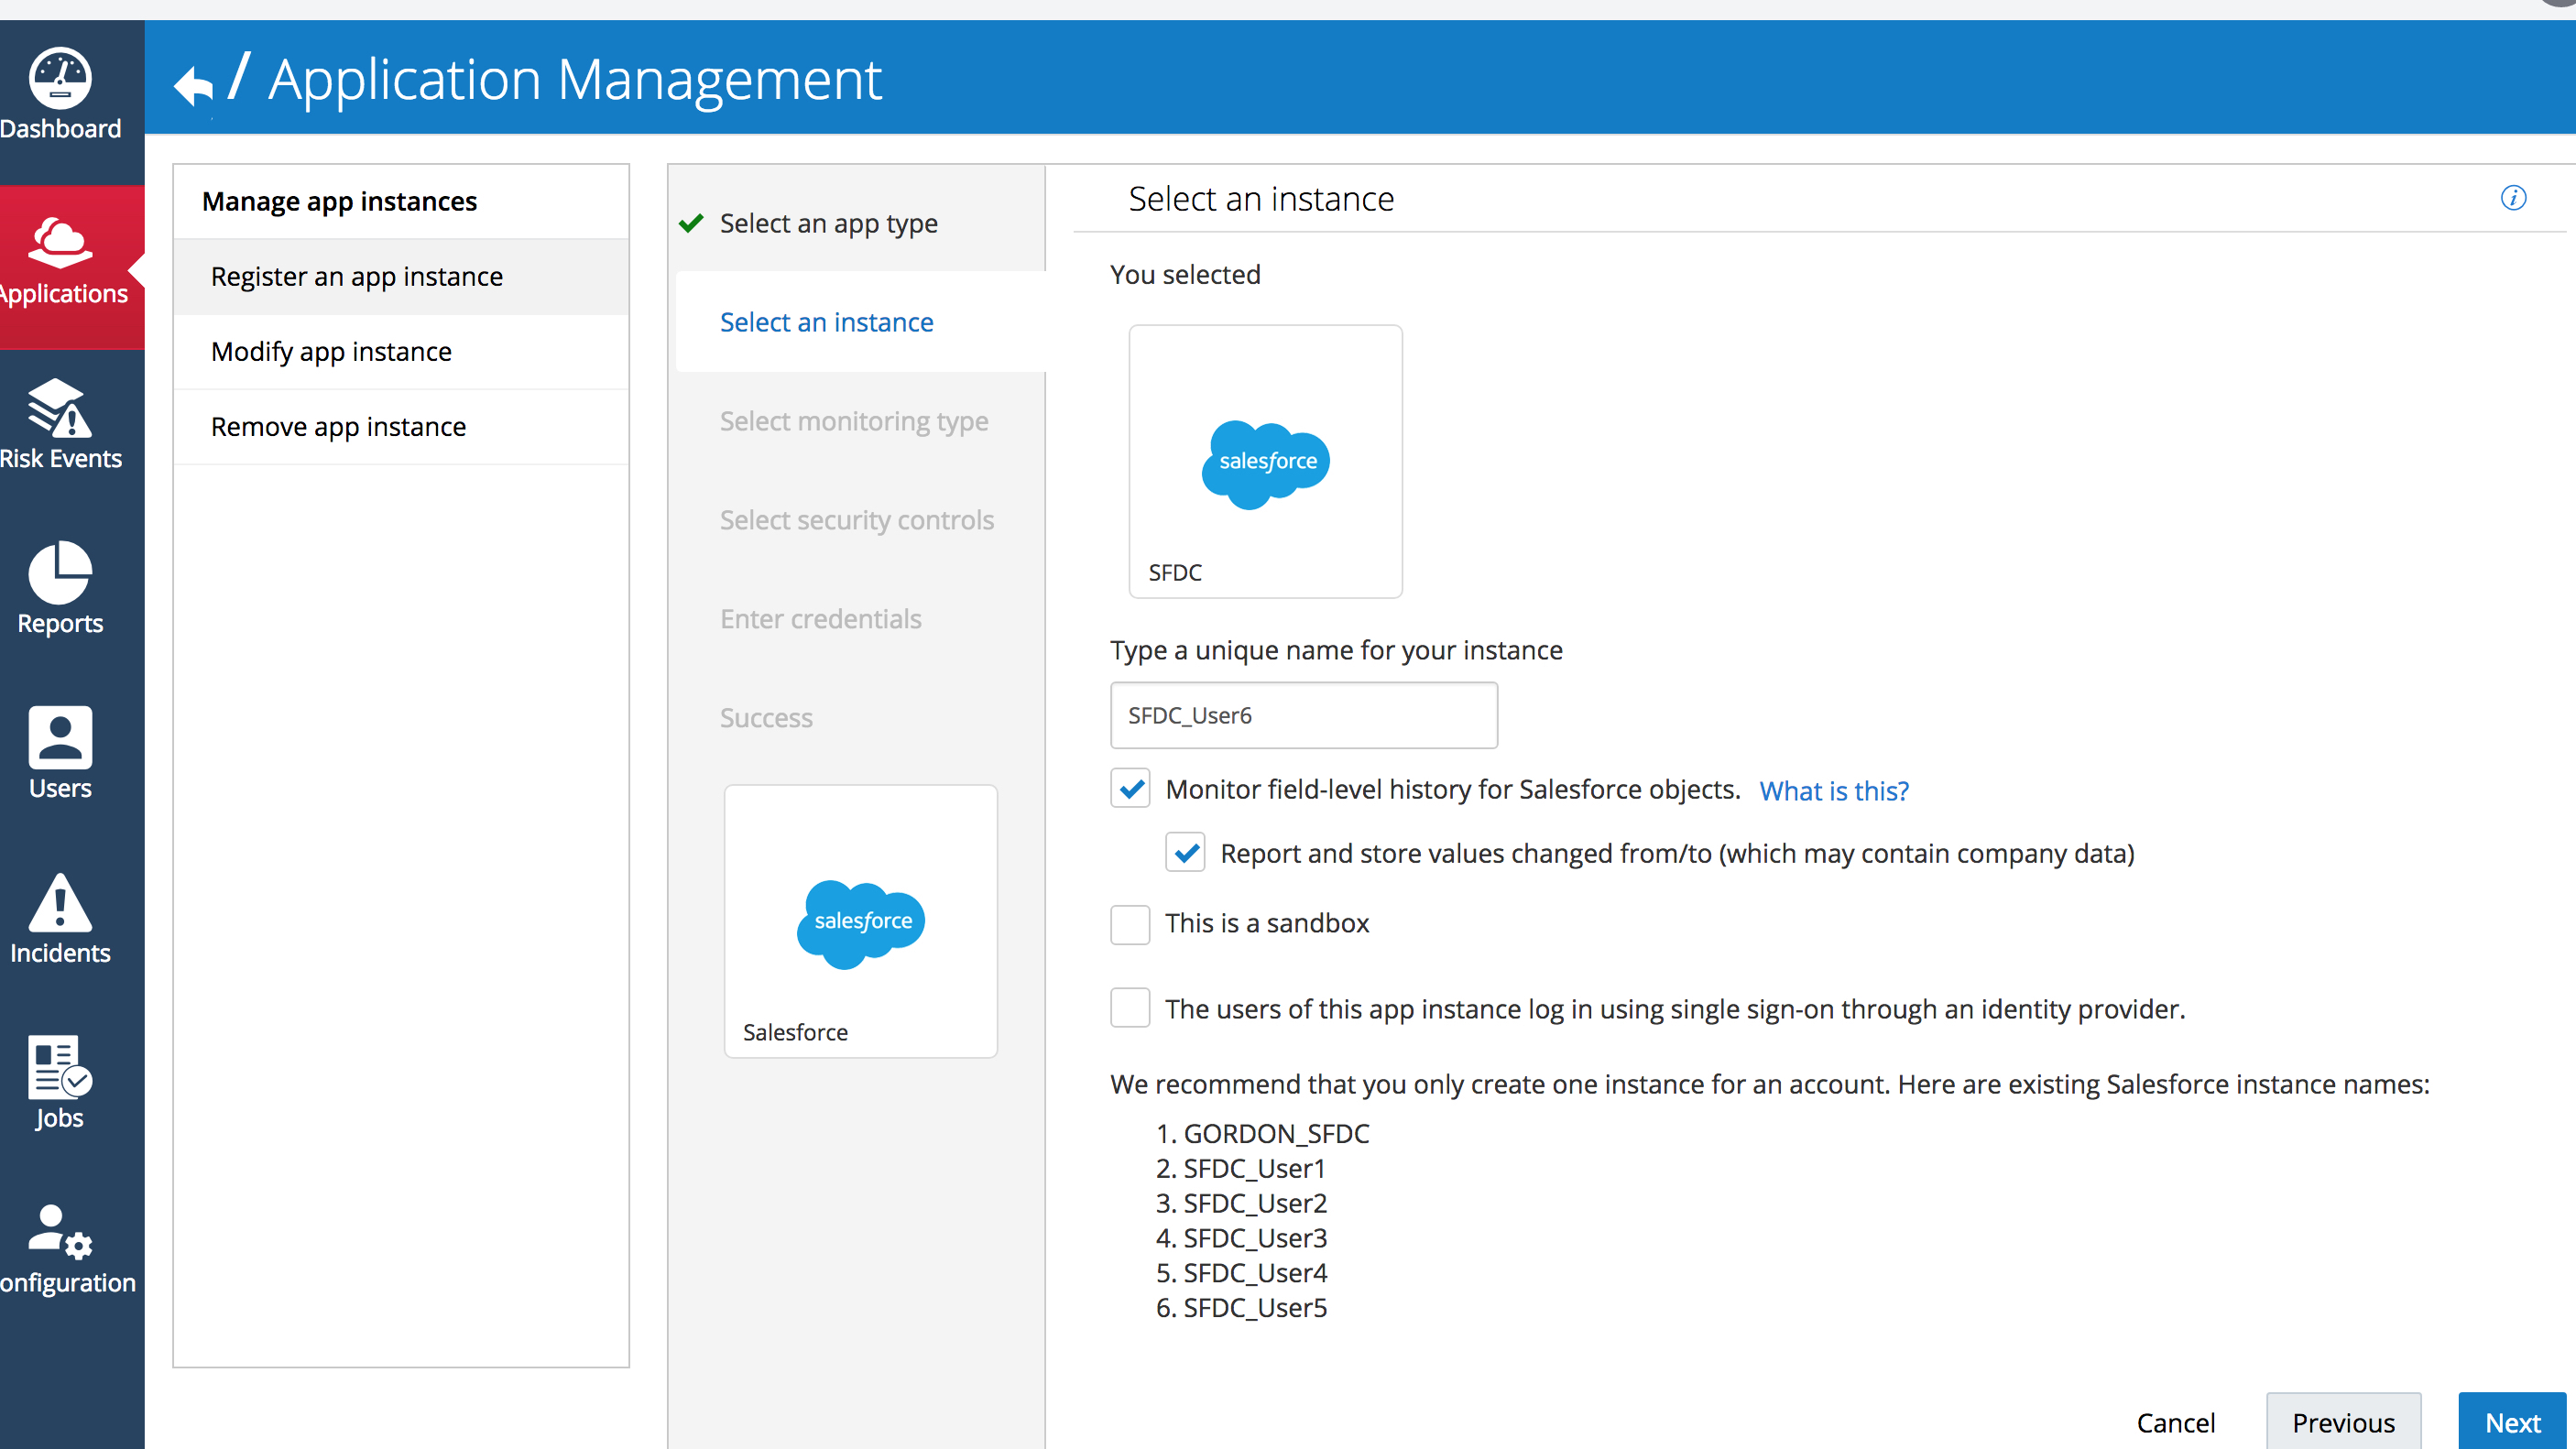
FYI, If a Salesforce account is federated with a supported Cloud Identity Provider (IdP) you can select the “The users of this app instance log in using single sign-on through an identity provider” checkbox and select the Identity Provider being used from a list of pre-configured providers
STEP 4: Select Security Control Monitoring Option
Security controls will be explained in more detail in a later exercise but suffice it to say for now that Enterprise Cloud Applications have security-related settings, such as password complexity requirements and idle session timeouts, that Oracle CASB Cloud Service can monitor and change according to a baseline configuration, for a particular Enterprise Cloud Application, that is defined in CASB Cloud Service
On this screen, we can choose to either:
"Monitor-only" in which case Oracle CASB Cloud Service reports on these security control values, but doesn’t change them in the cloud application.
or
"Monitor and push" the preferred values to the cloud application. At registration time, Oracle CASB Cloud Service ensures that your cloud application has your preferred security configuration values. After registration, Oracle CASB Cloud Service reports on changes to these values.
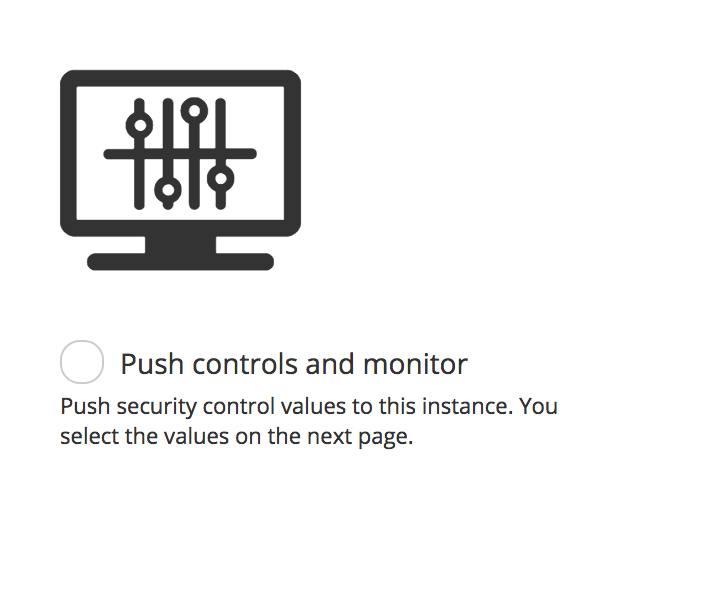
Select the “Push controls and monitor” radio button and then press the “Next” button.
STEP 5: Select “Standard” Security Controls Policy
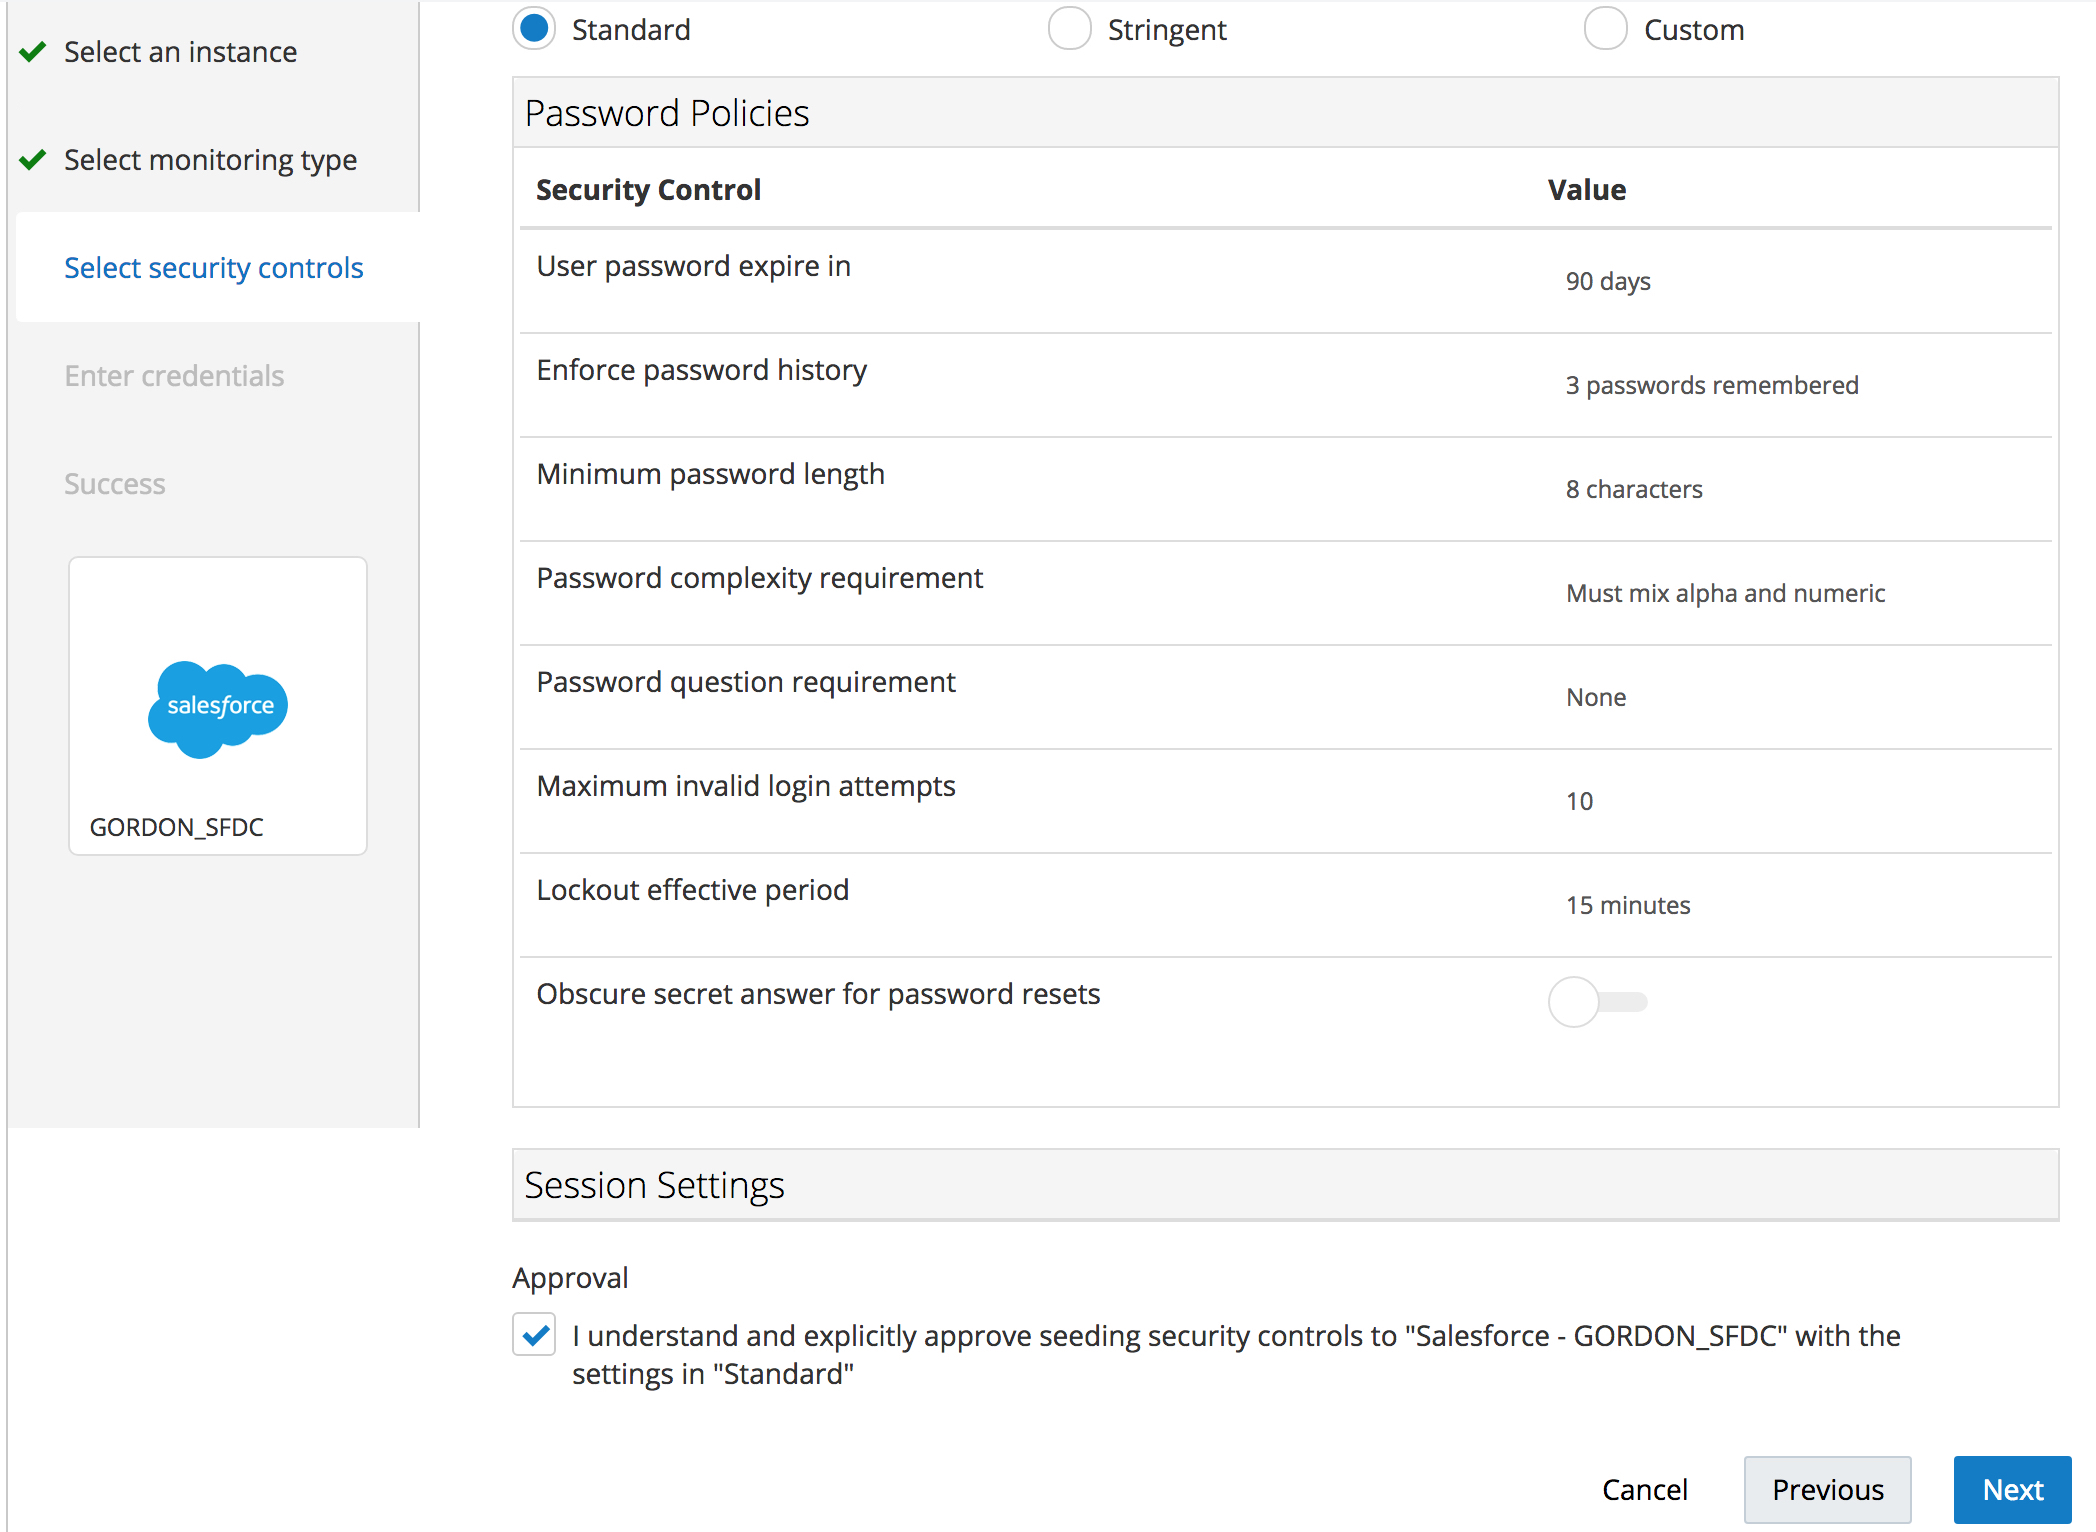
Because the monitor and push option was selected an “Approval” radio button will be displayed that will prompt you to acknowledge and consent to CASB Cloud Service making changes in the target service (Salesforce in this case) to bring its security configuration in compliance with the selected Security Control baseline.
Click the “Next” button
Optional: You can review the Controls being monitored and enforced under the Standard and Stringent Security Controls baselines. You can also define your own security control baseline by clicking on the Custom radio button and configuring the security controls you would like to enforce for a given sanctioned app.
STEP 6: Authenticate to Salesforce and allow CASB to access your Salesforce Account
You will be redirected to Salesforce to login (a second time ) , and you will see the following screen in the process:
Use the credentials for the Salesforce tenant that has been assigned to you during the workshop. Upon login, you will be asked to confirm that you want to grant access to the Oracle CASB Cloud Service:
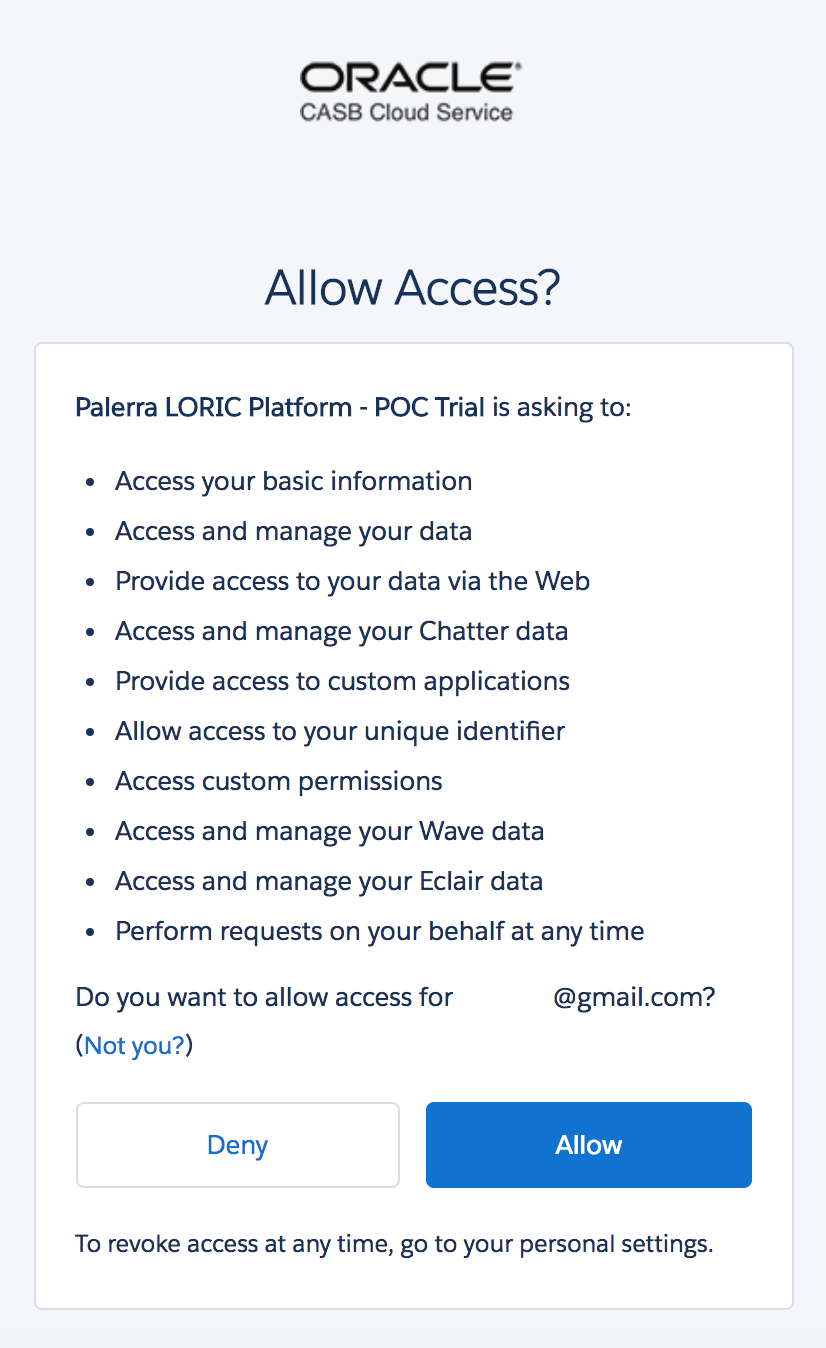
Click the Allow button to allow the access. (You will be redirected back to the Oracle CASB Cloud Service.
Then click on the “Done” button on the following screen that informs you about the data collection delay that you should expect
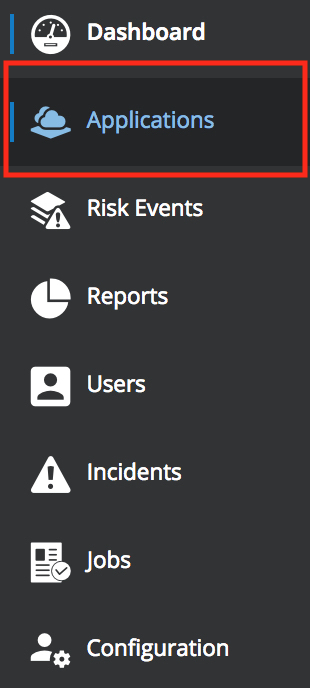
Click on the “Applications” navigation option using the Navigation Bar on the left of the CASB UI.
![]() CASB will now start the initial data collection for the new application . You can expect this initial data collection to complete within 30 to 120 minutes. While the initial data collection is taking place, the application will be tagged with the “NEW” banner in the application list.
CASB will now start the initial data collection for the new application . You can expect this initial data collection to complete within 30 to 120 minutes. While the initial data collection is taking place, the application will be tagged with the “NEW” banner in the application list.
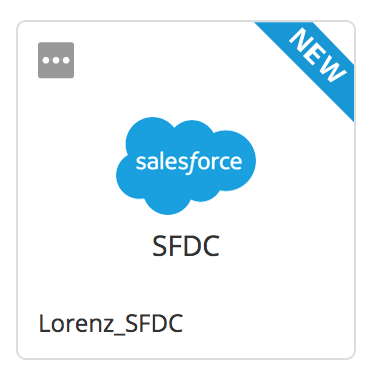
After the data load has taken place, the application will shed the “NEW” banner
STEP 7: Review changes made in Salesforce to bring it in line with the Security Control baseline we selected.
Recall that we changed the password policy in Salesforce to never expire, however notice that the security control we selected with the “Standard” baseline requires the password to expire in 90 days. As the Salesforce service is being on-boarded CASB will access the Salesforce APIs to change the password policy, among many other configuration settings, in Salesforce to comply with the security control baseline we selected in CASB.
You can verify the changes by logging on to Salesforce and, as in Step 1 of this exercise, navigating to the “Setup” menu, then use the upper-left “Quick Find” box to search for “Password Policies” (no quotes) and review the “User passwords expire in” field to verify that it has been changed back to expire in 90 days, also notice that the enforce password history has been changed back to “3 passwords remembered”.
Since we selected to have the CASB Cloud Service push the security control setting to Salesforce the new Salesforce instance should not have any violations, After the initial load is complete, and should appear in the low risk services category.
Exercise 2. Reconfigure Security Control Baseline
Update the CASB security control baseline for your assigned Salesforce instance. Select “Applications” in the left navigation bar

then find your assigned Salesforce instance (use the search icon in the upper-right, if necessary), click on the instance, click on “Modify”, and then from the drop-down selection choose “Update Security Control Baseline”.
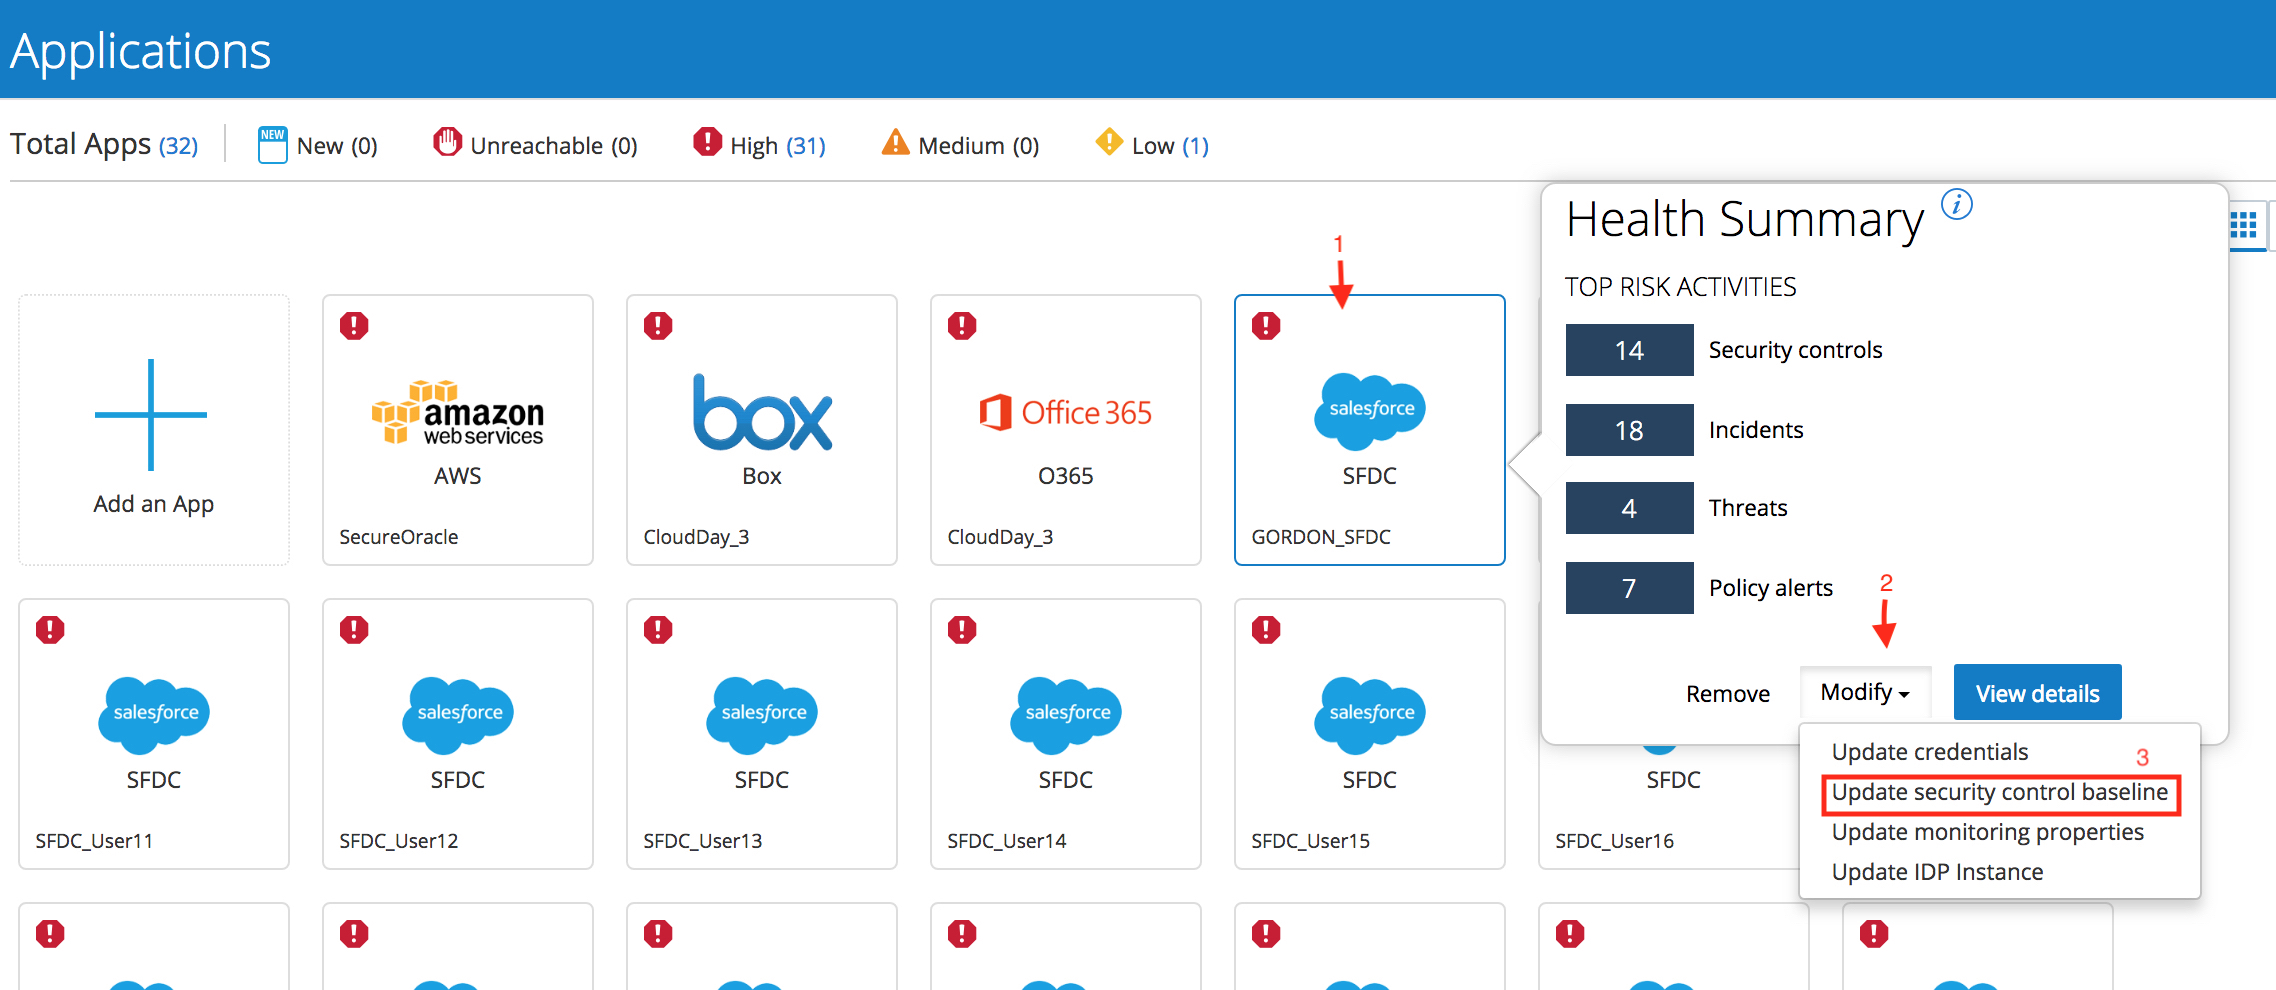
The current baseline should be “Standard” , in the next screen, choose to use a “Stringent” security control baseline.
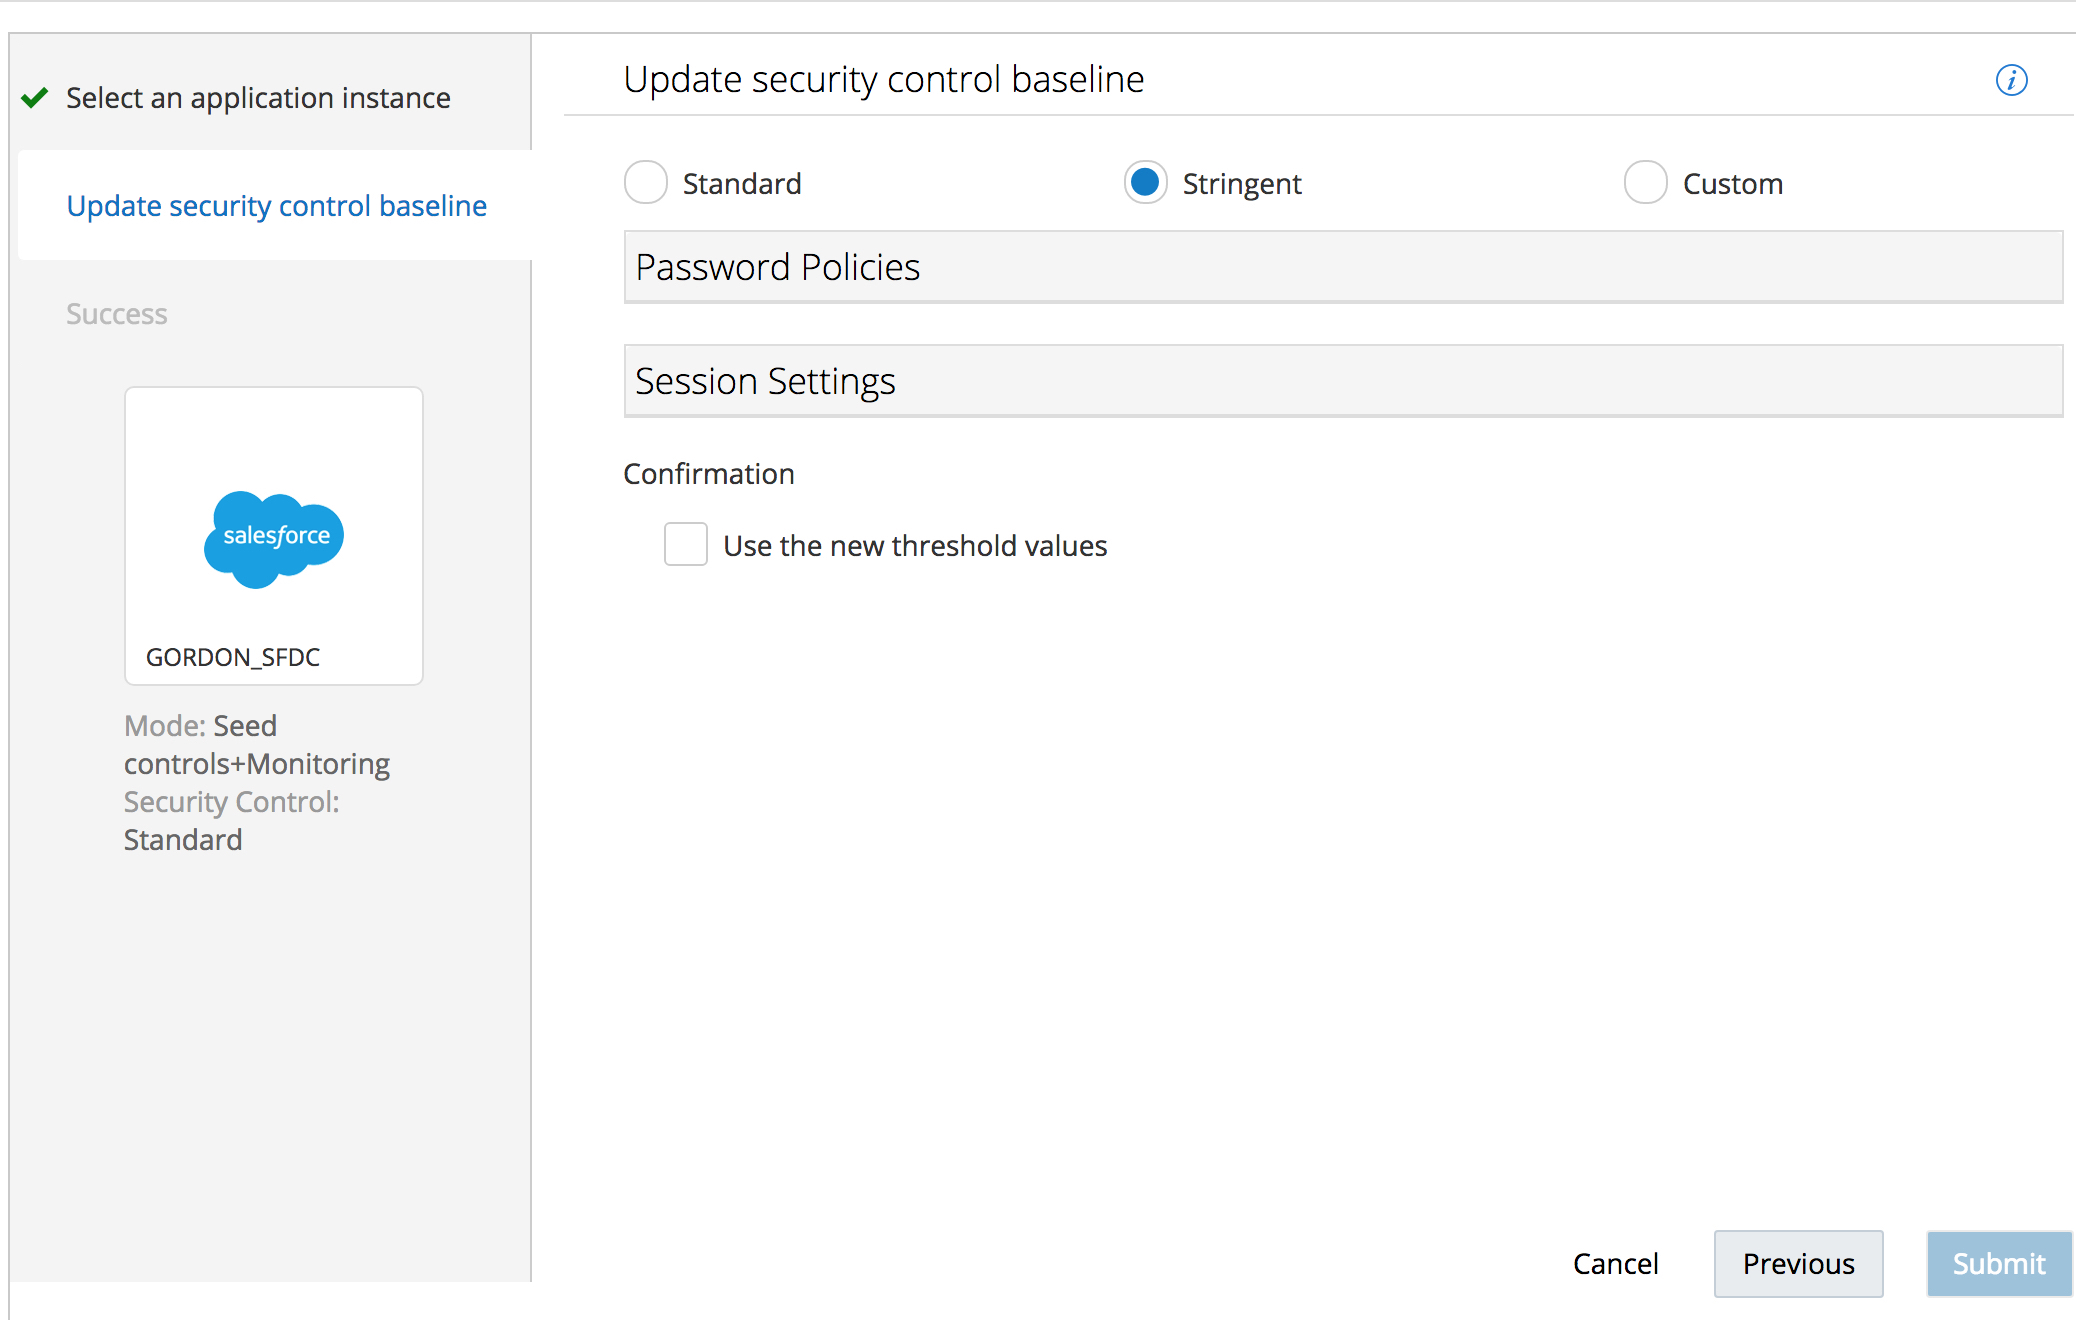
Expand the Password Policy and Session Settings sections to see more detail on which controls are being enforced by the “Stringent” Security control baseline.
Check the Confirmation box that says to “Use the new threshold values” and click on the
“Submit” button.

You will now see a message that indicates that the baseline has been updated. Click the “Done” icon.
Exercise 3. Risk Events & User Risk
Overview:
Risk events encompass anomalies and threats that Oracle CASB Cloud Service detects.
Oracle CASB Cloud Service monitors user and agent behavior and automatically generates risk scores and alerts based on their activity patterns. To take advantage of this data, you must find and analyze users at risk, suspicious activity patterns, and activity from suspicious IP addresses.
Exercise:
STEP 1: Add a blacklisted IP address.
In the Oracle CASB navigation menu of your Oracle Cloud trial account tenant, click on “Configuration” and then click on “Manage IP addresses”. At the top of the screen you will notice three tabs: “Blacklist”, “Whitelist”, and “Exception”. In the “Blacklist” tab, click the “Add IP Address” menu item. You can choose to add an Individual Address or an Address Range. In our case, we’ll add our own current IP address as an Individual Address.
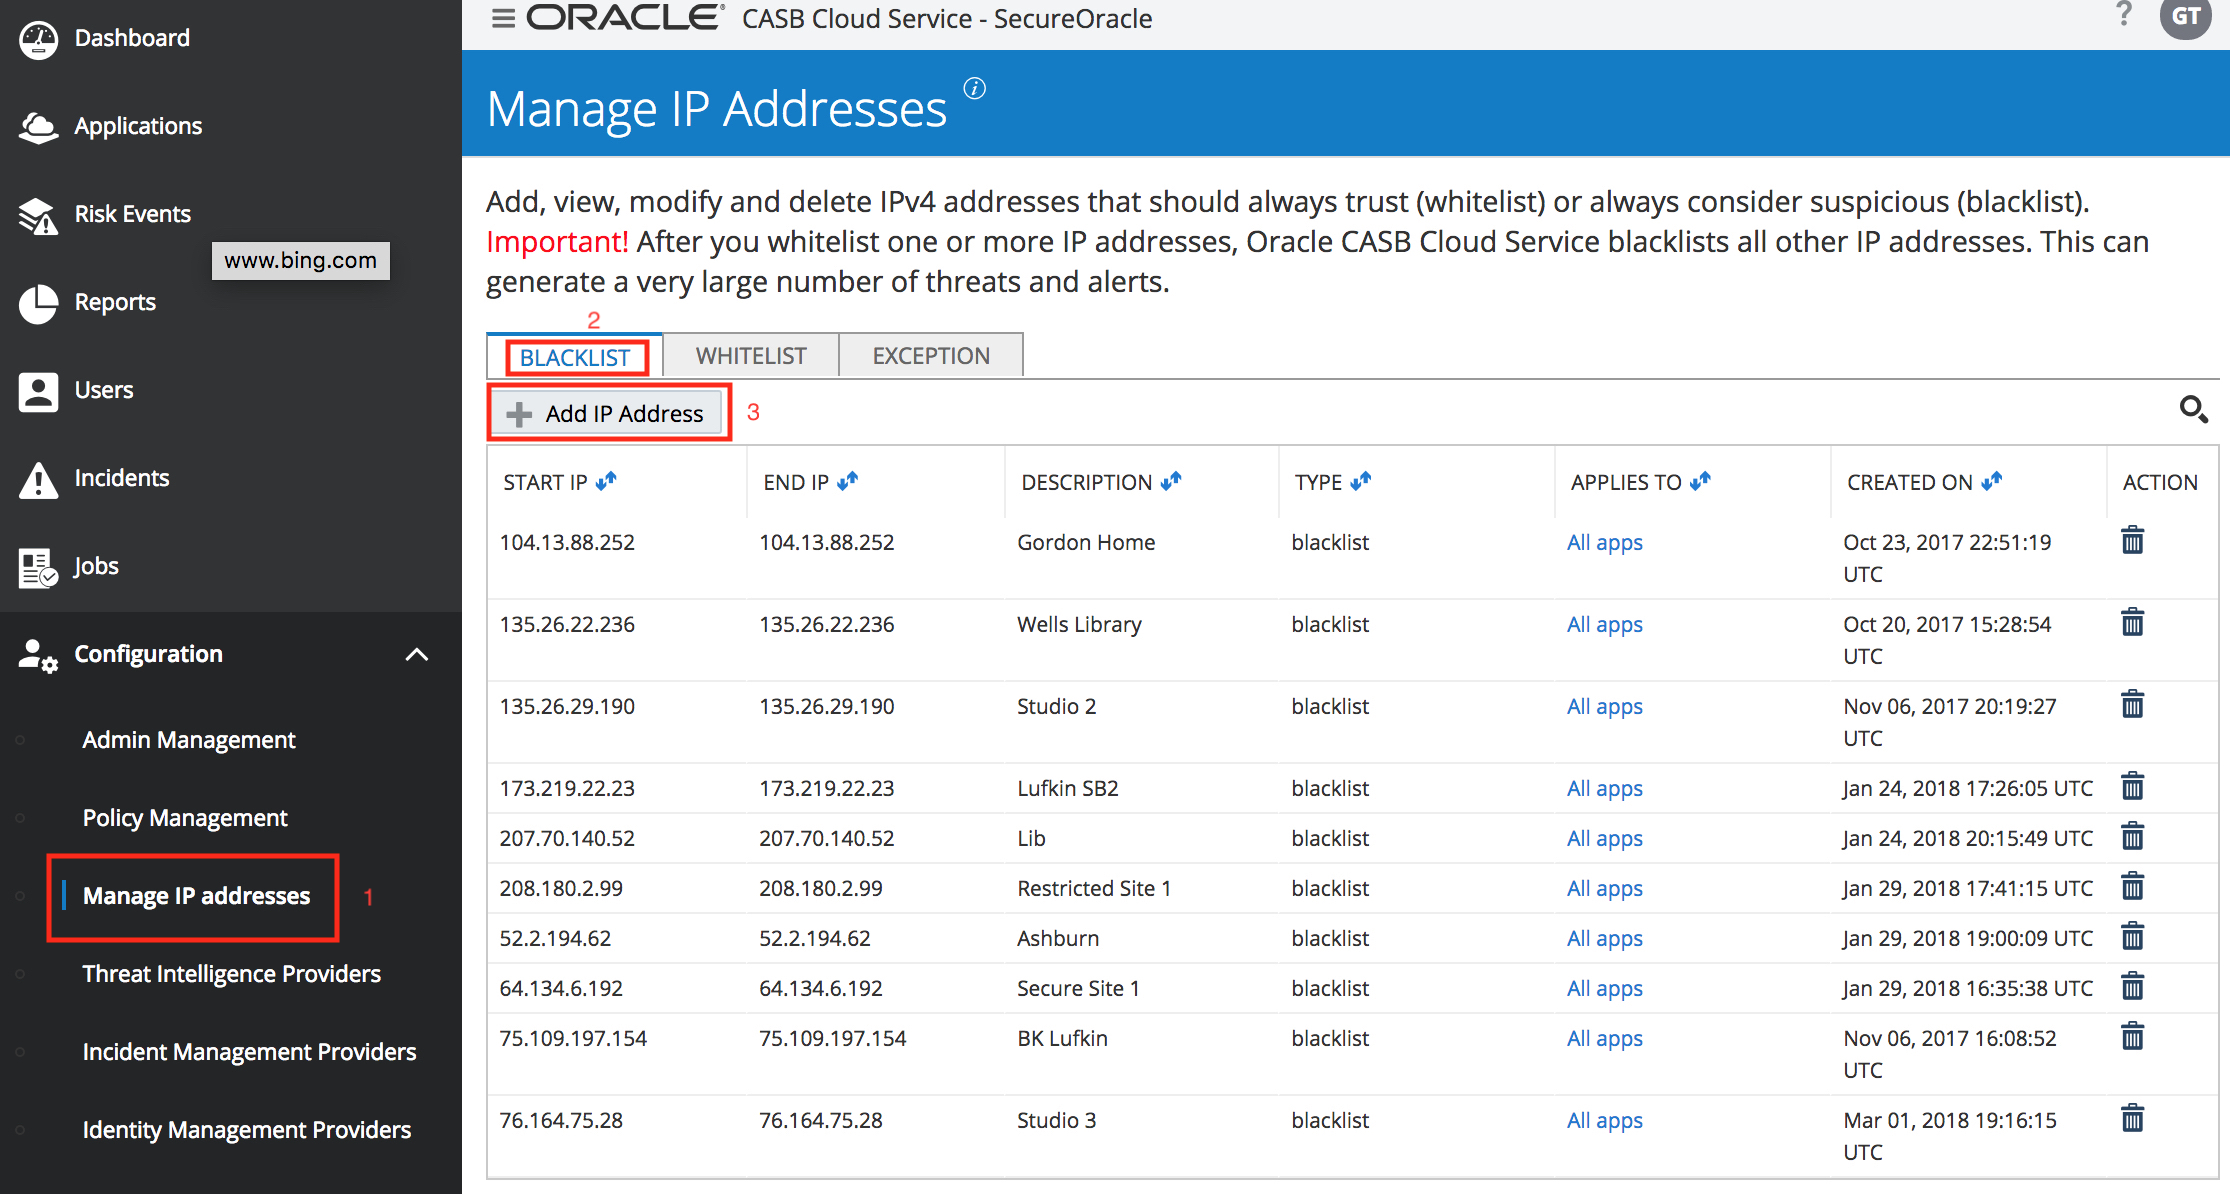
To discover your current IP address you can access this link
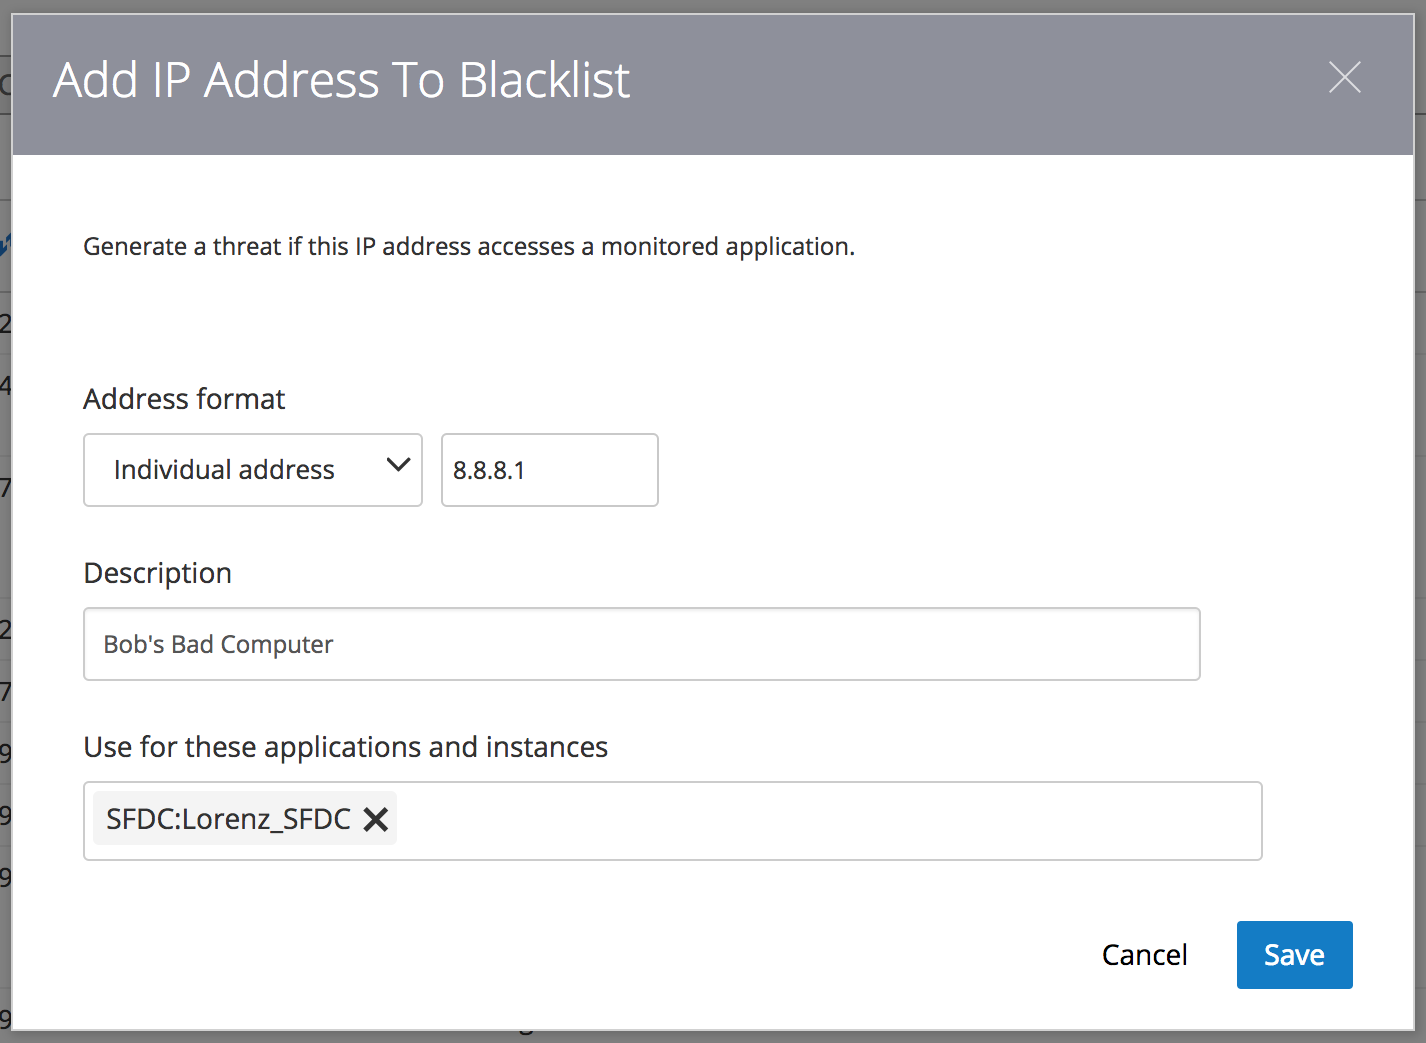
Note, that the Salesforce instance you will use on this dialog will be the one you on-boarded in Exercise 1.
STEP 2: Log in to Salesforce
IMPORTANT : If you are already logged in to Salesforce ensure you log out of Salesforce first and then log in to Salesforce again.
When you log in to Salesforce from your blacklisted IP you ensure that a future risk event will be generated for Salesforce that will flag your access to Salesforce from the black listed IP address.
Exercise 4. Policies
Overview:
A policy is a rule or a guideline, such as, “only people in Finance can view files in the Finance folder”, or “any change to network access rules must be reviewed”. You can define policies based on particular cloud services, resources in the service, actions on the resource, and optionally items such as actors, recipients, whole groups of users, domains, and IP addresses. In Oracle CASB Cloud Service, you define policies based on:
-
Particular cloud services, such as Box, GitHub, or ServiceNow.
-
Particular resources in the service, such as a file or folder, or any resource in the service.
-
Particular actions on the resource or resources, such as share, download, or collaborate.
-
And, optionally, items such as actors, recipients, whole groups of users, domains, and IP addresses.
Oracle CASB Cloud Service generates an alert whenever an event that matches the policy occurs. The console displays a description of the policy violation and can provide recommendations for responding to it. You can also configure the alert to be sent to you over email or SMS.
Exercise:
In this exercise we will define a policy, for Salesforce, that will generate an incident when “Any” action is performed on the Salesforce CEO role (This includes adding or removing users to the role).
STEP 1: Create a Policy
The basics of a policy consist of these components:
Actions that users or administrators perform (for example, creating or deleting)
Resources that these users act upon (for example, files, folders, or EC2 instances).
Optionally, you can identify additional filters such as people or groups who perform the action, the IP address of the actor, and the recipient of the action (for actions such as sharing and collaboration).
You can also add instructions for the person who reads the alert. For example, if you create an alert related to deleting access control lists, you can add instructions to inform the group that is responsible for managing the access control lists.
You can set up email notifications when the alert is triggered. This supplement the ability of users to request notifications for all high-risk events in Setting Your Password, Time Zone, and Email Alerting.
STEP 1.1: In the Oracle CASB Cloud Service console, select Configuration then select “Policy Management”
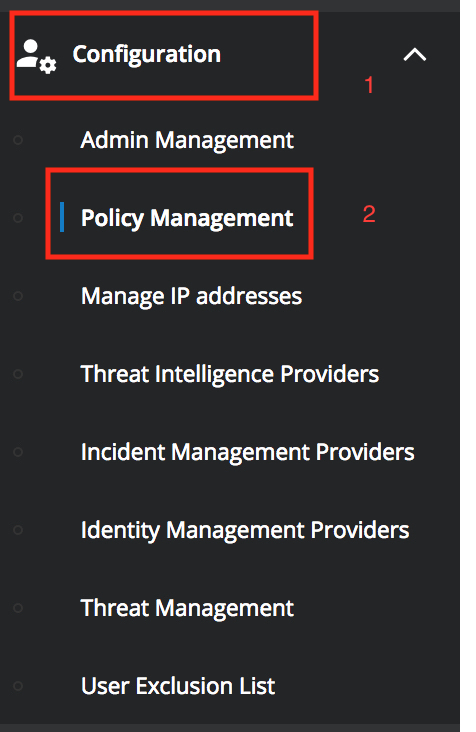
and then click New Policy

STEP 1.2: Complete the “Name” panel in the “New Policy” wizard
Choose a unique name of the format “YOURNAME_TEST_POLICY” Create a description for the policy, set the priority to “Medium”, and check the box to “Include in user risk score.” This is an example of how a policy can effect user risk scores, thus influencing the CASB machine learning algorithms.
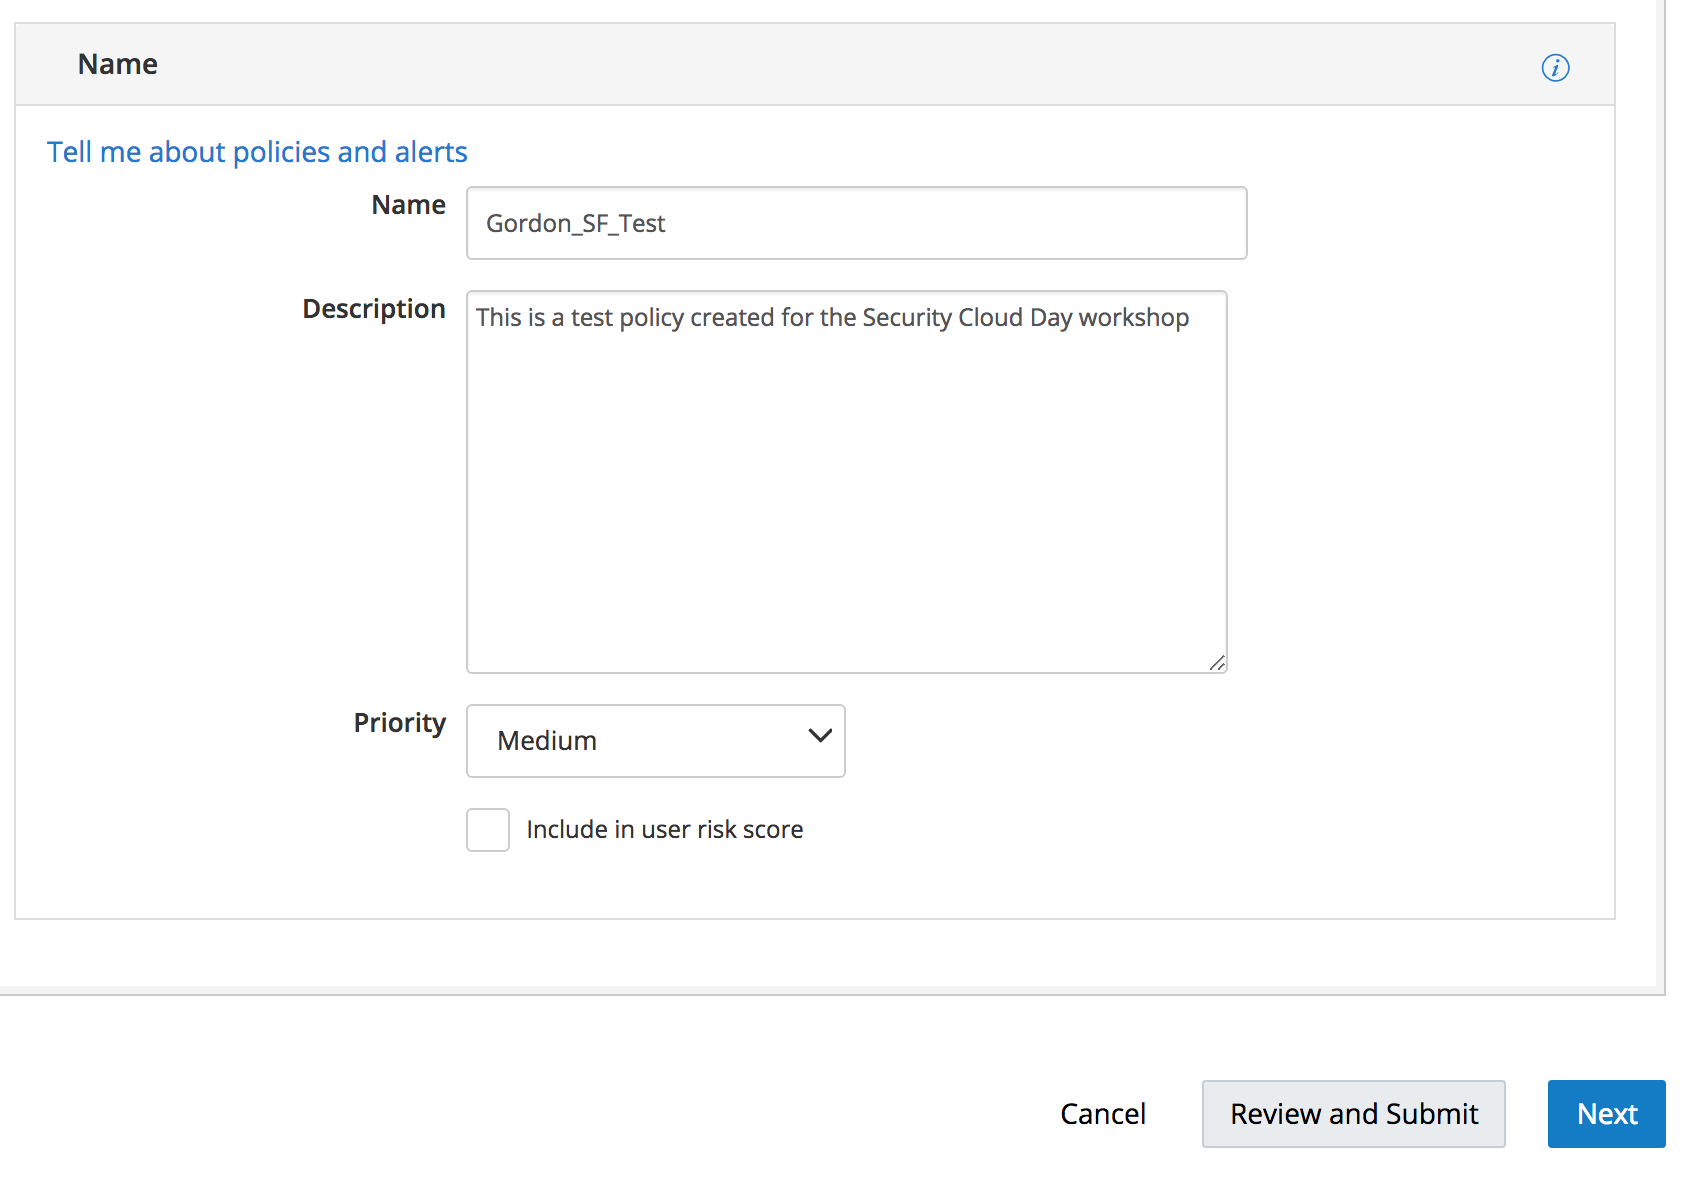 Click on “Next”.
STEP 1.3: Complete the “Resource” panel
Select “Salesforce” for the “Application type”, choose your Salesforce instance as your “Application Instance”, select “Role” as the “Resource”. And choose a text expression of “CEO” for the “Resource Name”. For the “Action on this Resource” leave it set to “Any” (although valid choices also include Assign Role, Create Role, Delete Role, Revoke Role, and Update Role).
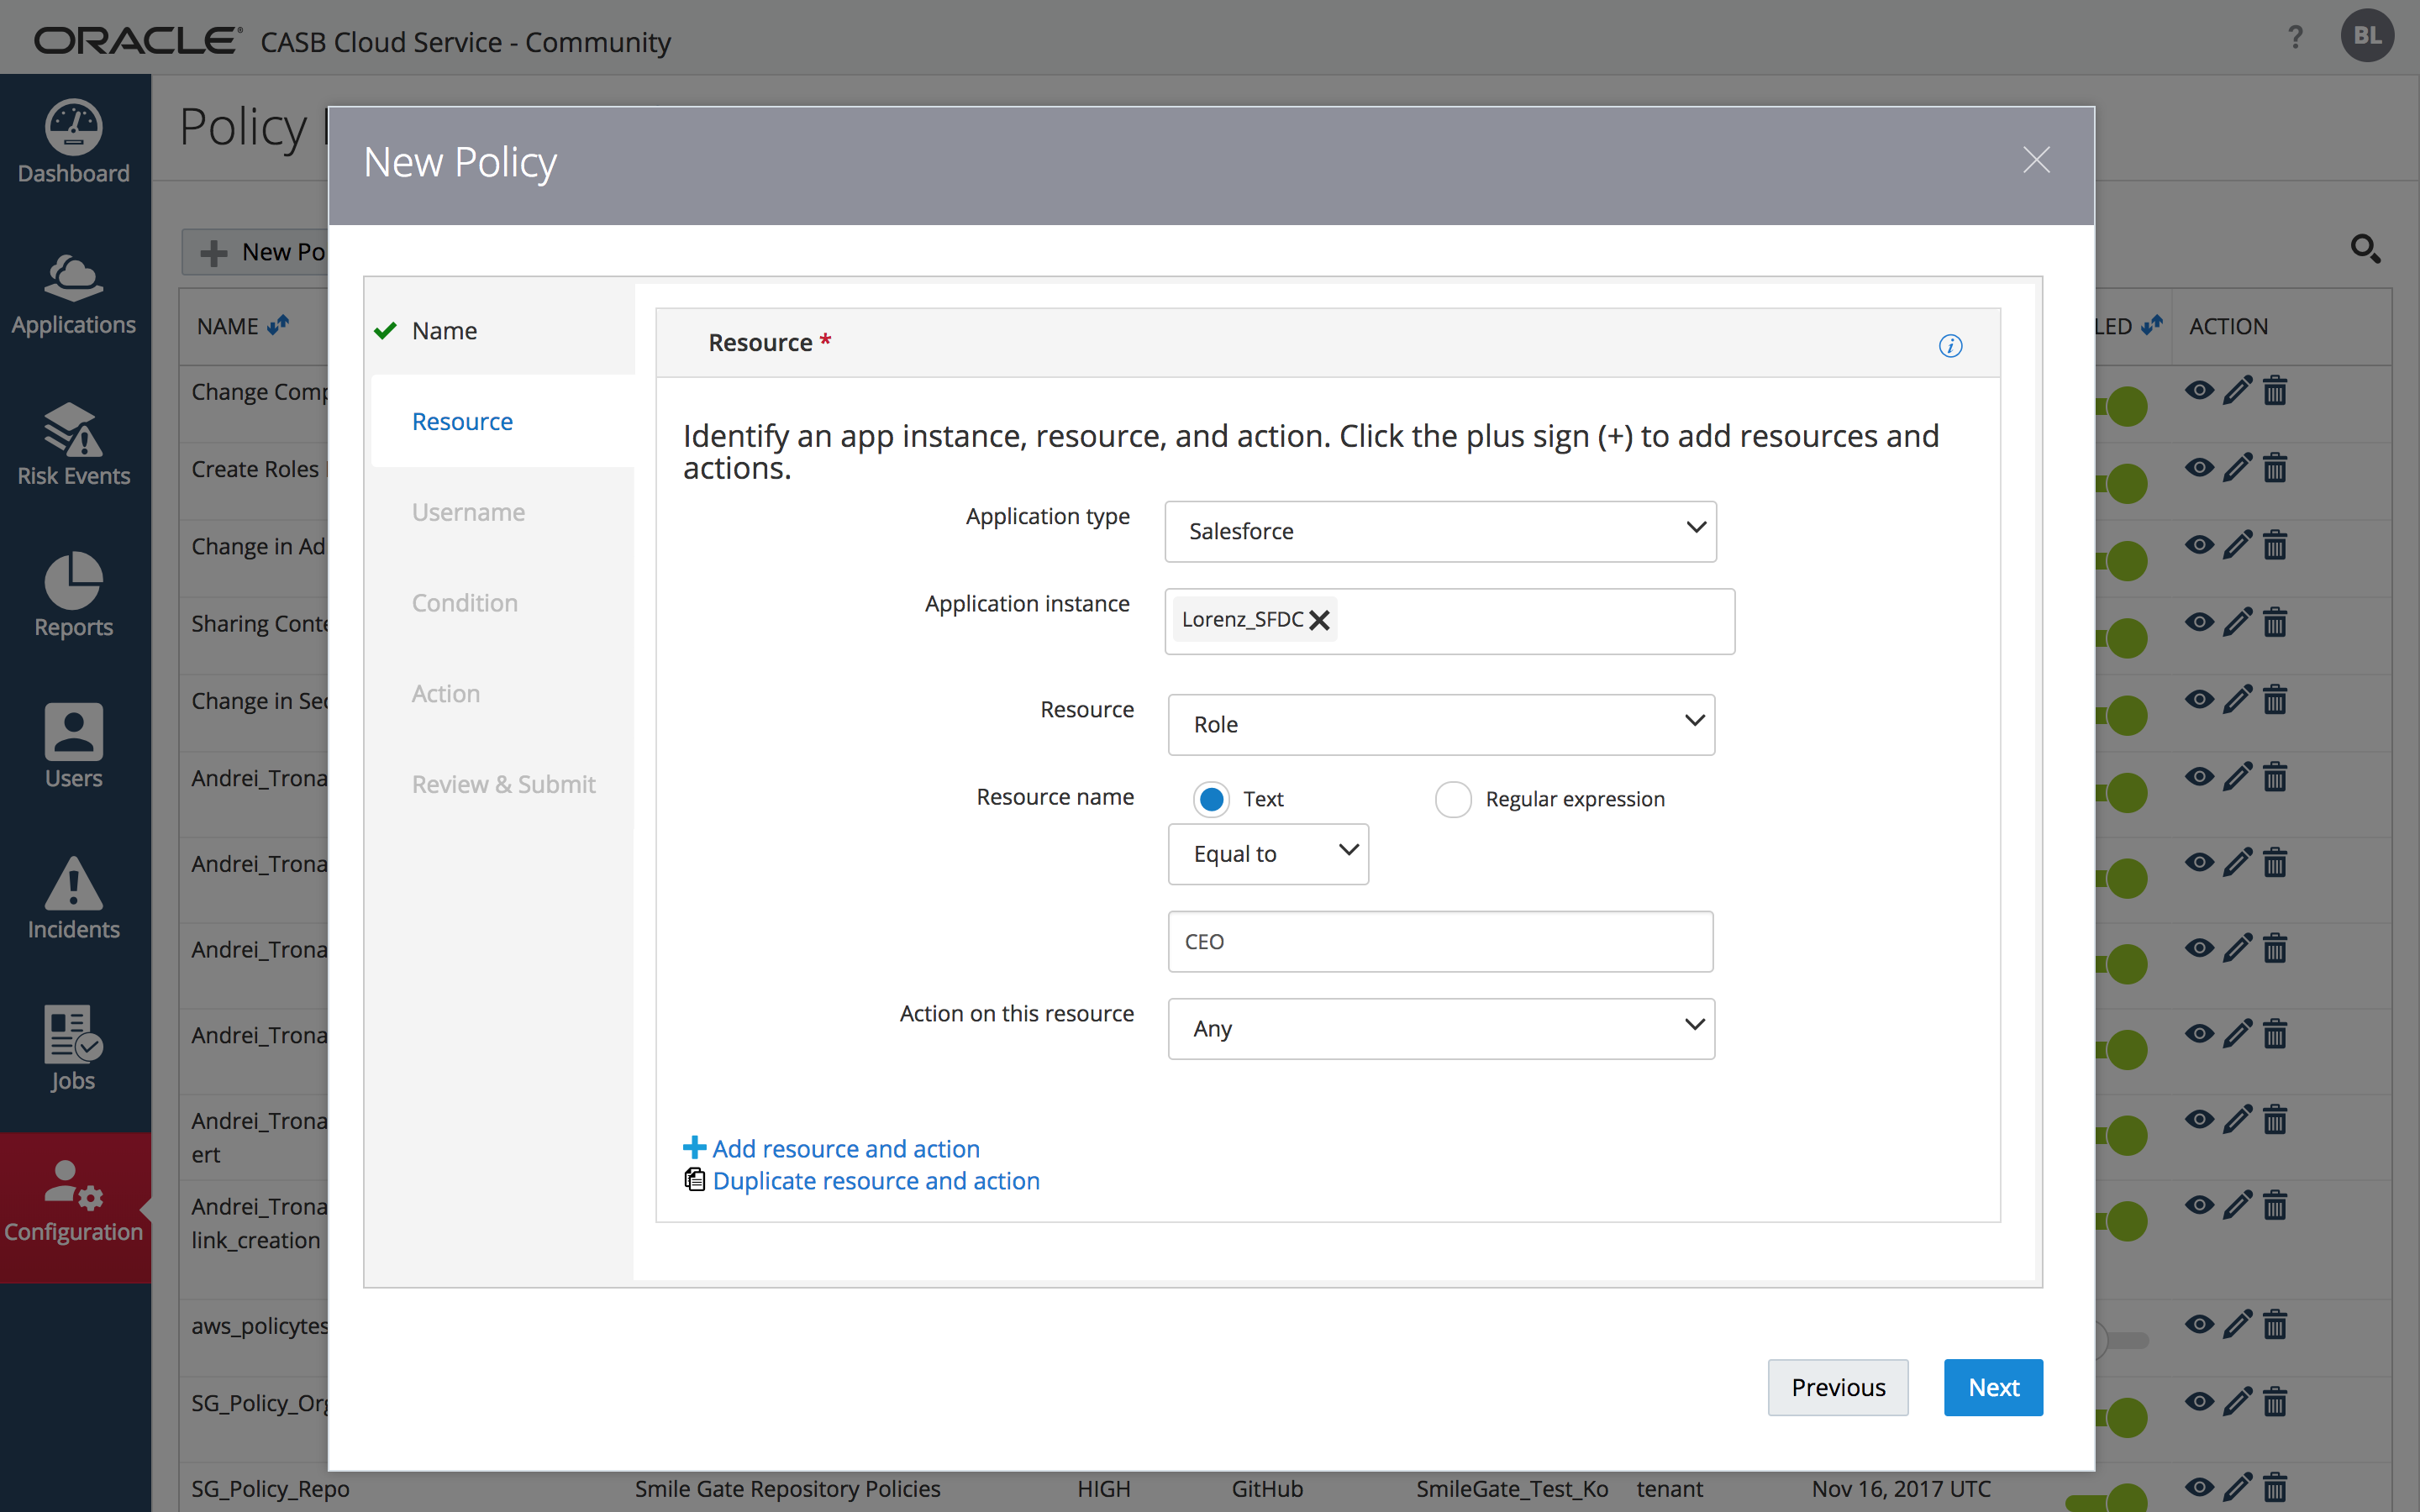
After adding this information, click on “Next”.
STEP 1.4: (Optional) Complete the “Username” panel
You can leave these settings as default (blank) and click the “Next” button
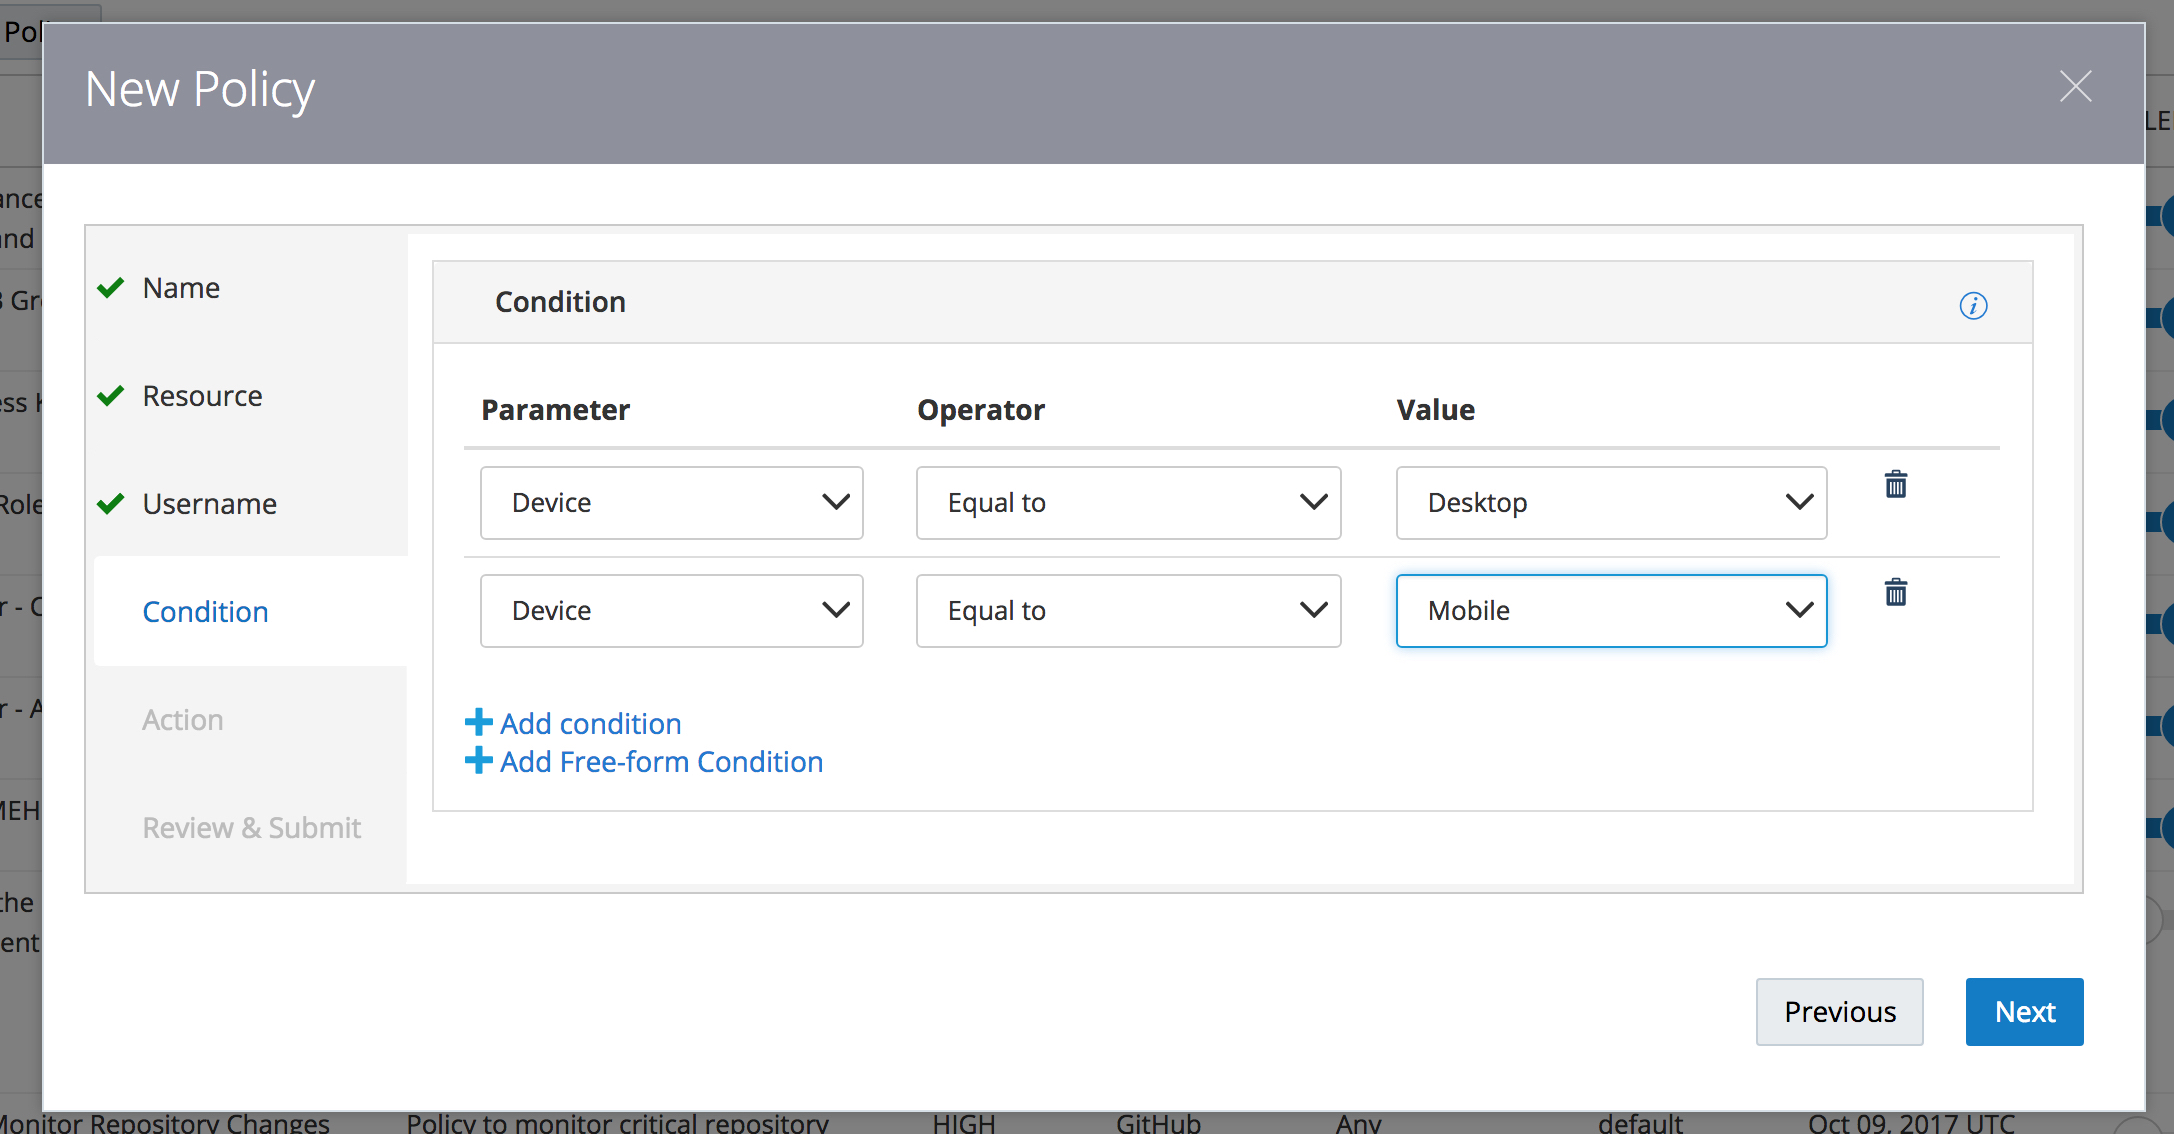
STEP 1.5: Complete the “Conditions” panel
Optional : Specify conditions to limit when the alert is triggered. Add two conditions: one condition for Device equal to “Desktop”, and a second condition for Device equal to “Mobile” (use the “Add condition” link to add the second condition). After adding the two policy conditions, click “Next” to continue.
FYI, You can specify a condition using either of these types of conditions multiple times, and you can specify either type of condition in any order, freely mixing the two types.
When you specify multiple conditions, the conditions operate independently. Each condition causes the alert to either be triggered (Equal To operator), or not be triggered (Not Equal to operator), for that specific condition. The conditions are neither ANDed nor ORed.
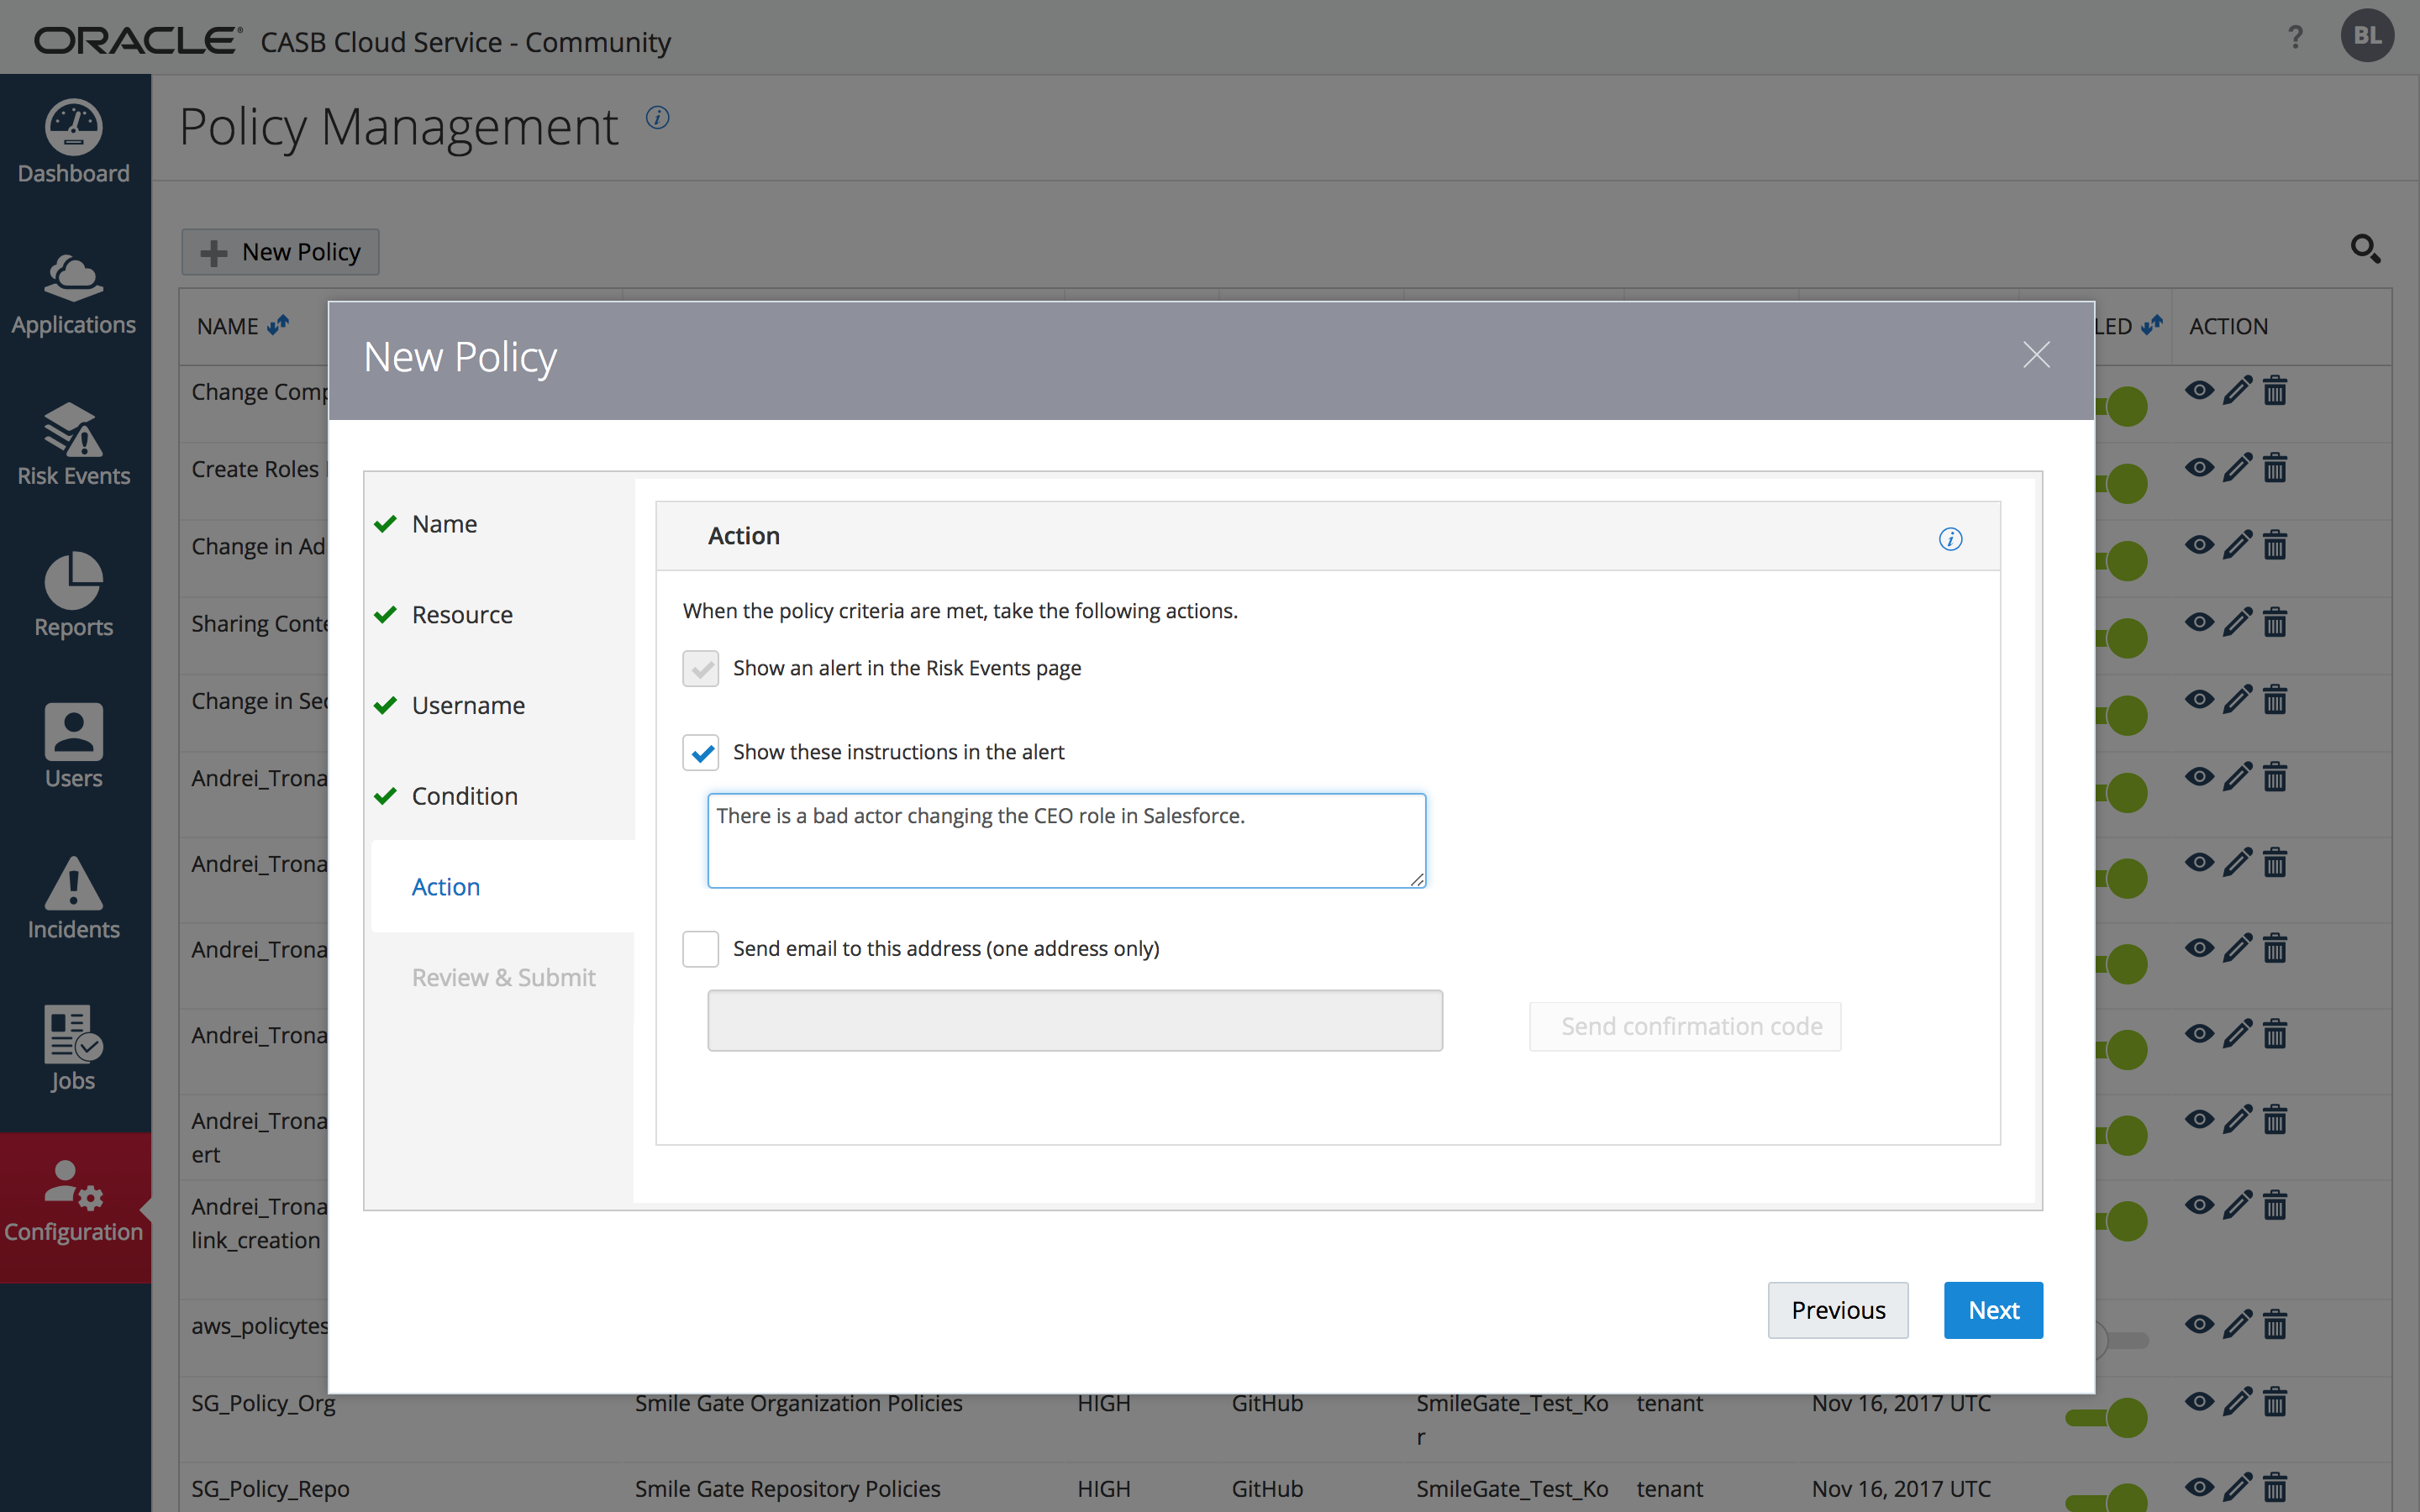
STEP 1.6: Complete the “Actions” panel
Create custom instructions for the resultant alert by checking the box for customization and entering a message. Note that alerts can also be sent in email. Click “Next”.
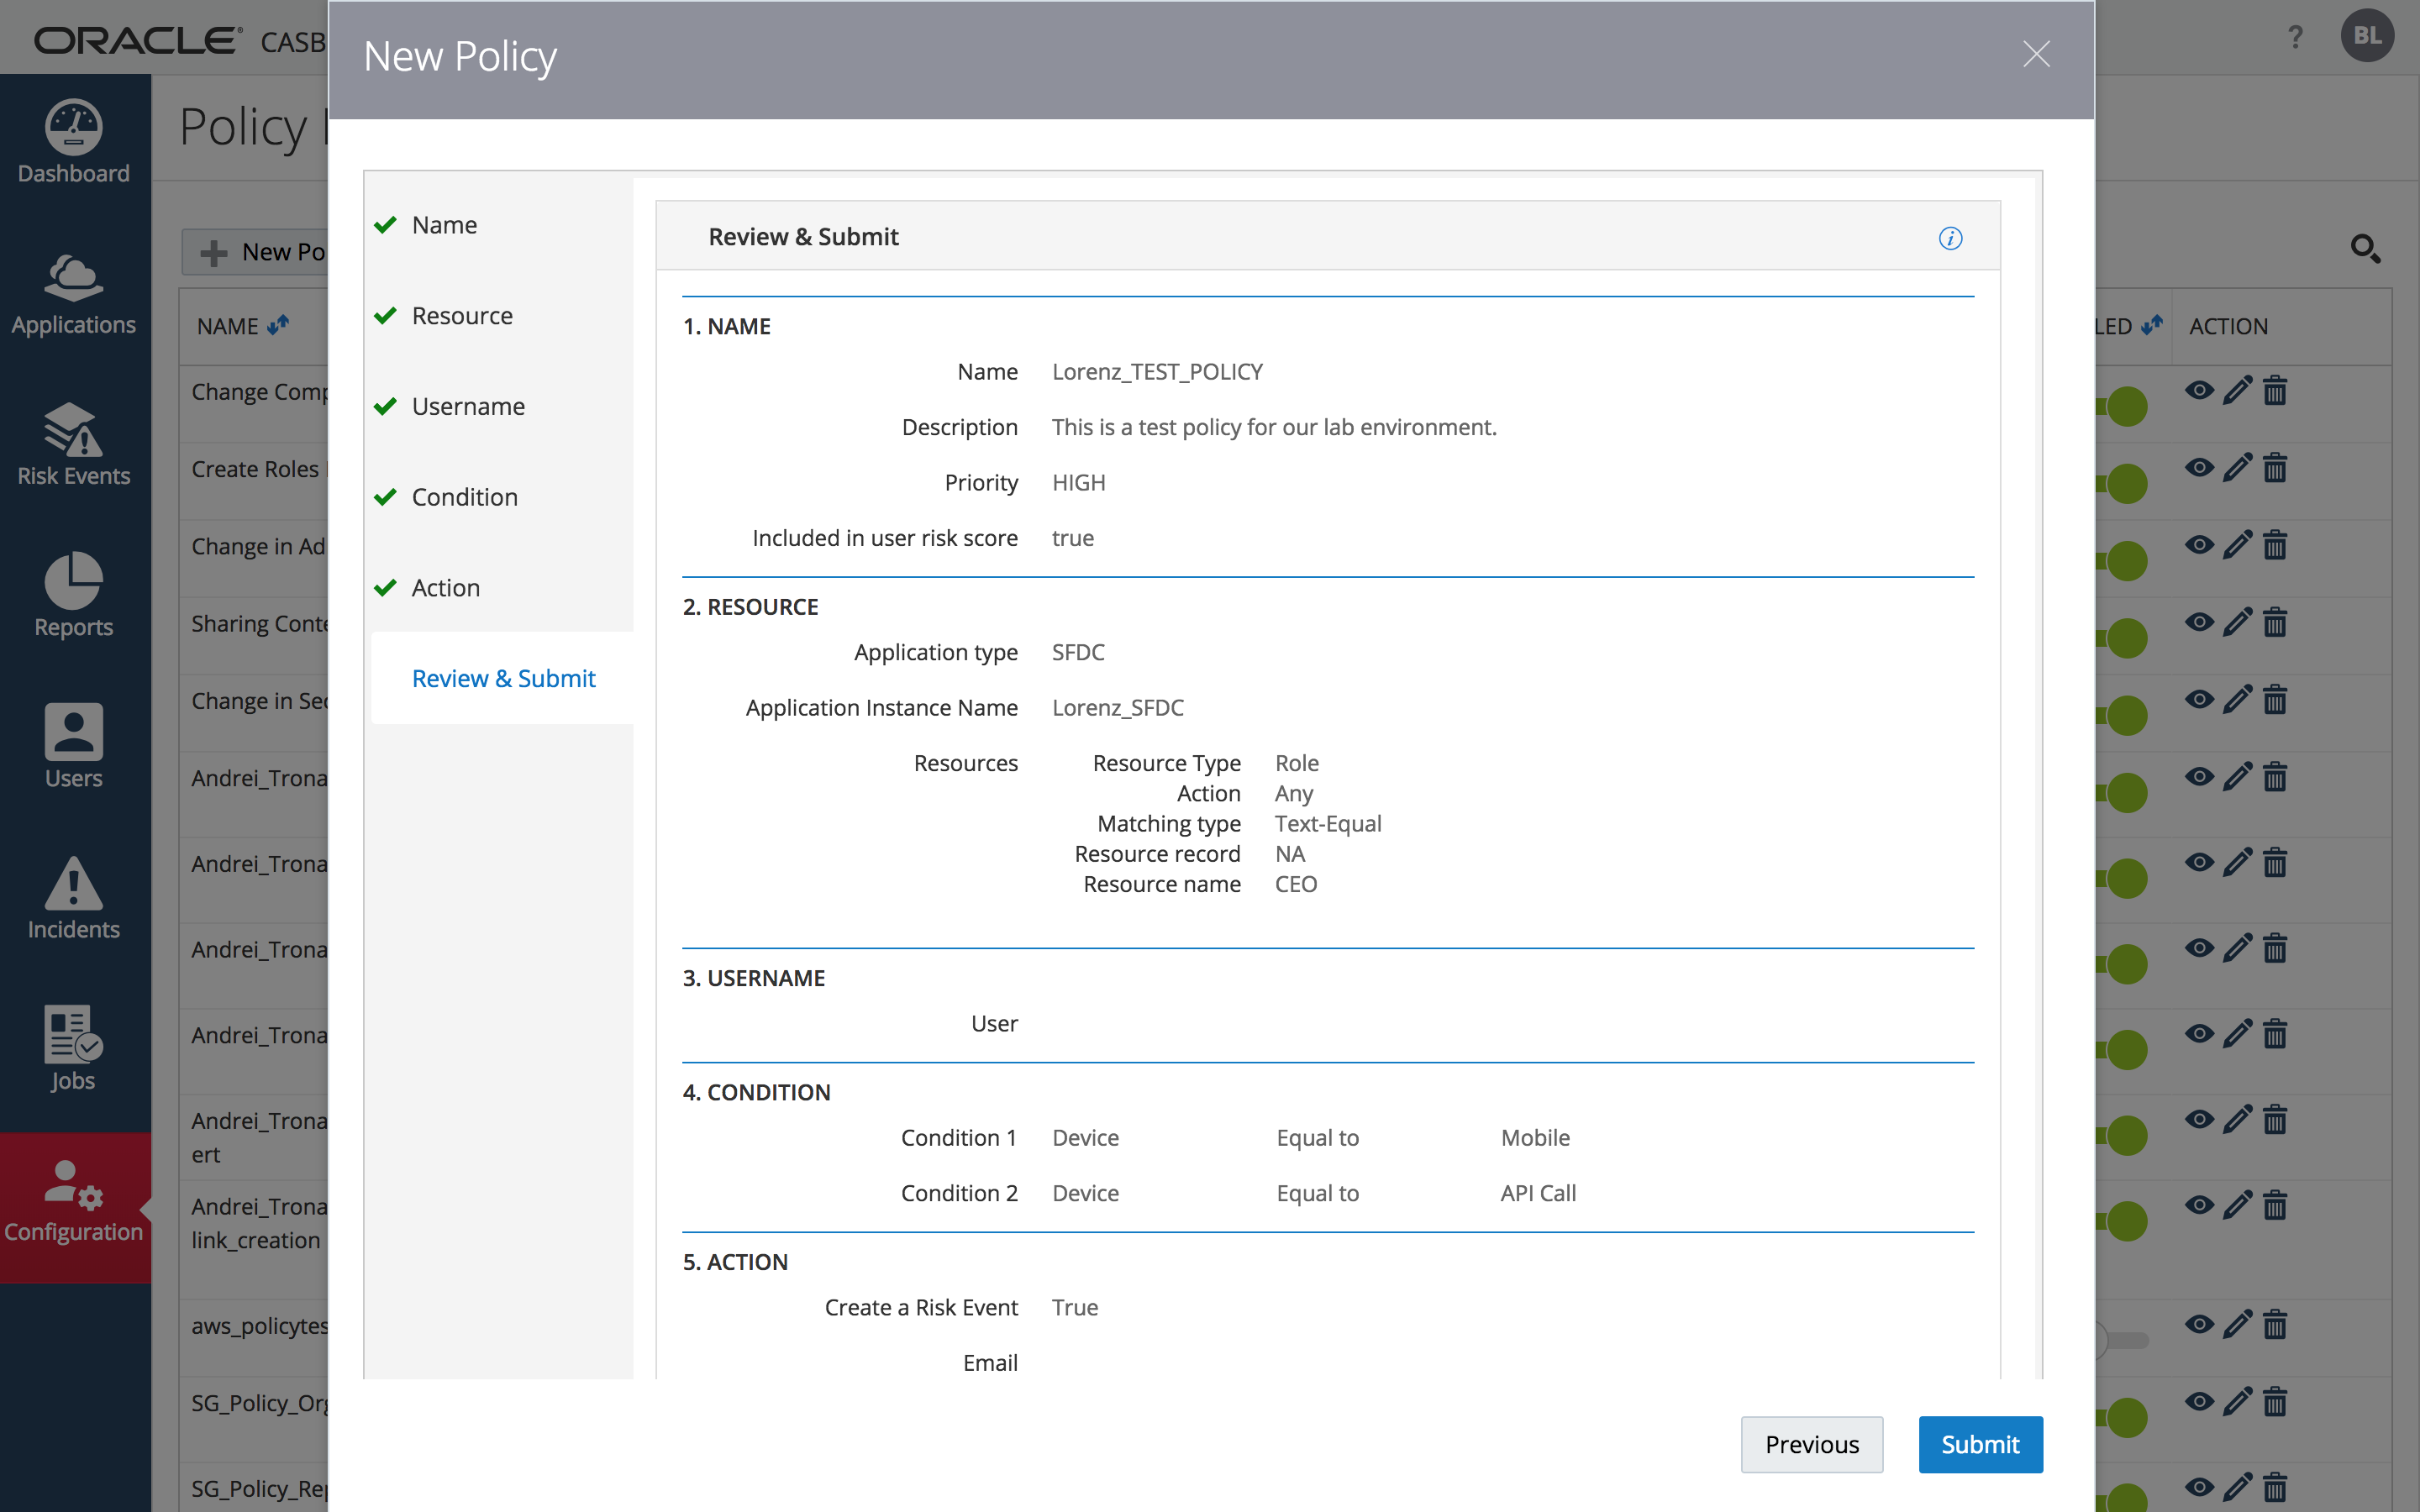
STEP 1.7: Click “Next” then “Submit” on the “Review & Submit” dialog
The Policy will appear in the list of policies available for activation for the tenant.
STEP 2: Trigger the Policy Alert ( Informative only )
To test the policy log in to the Salesforce account and perform an action on the CEO role that our new policy monitors.
#### STEP 2.1: In the Salesforce “Setup” section navigate to Users -> Roles
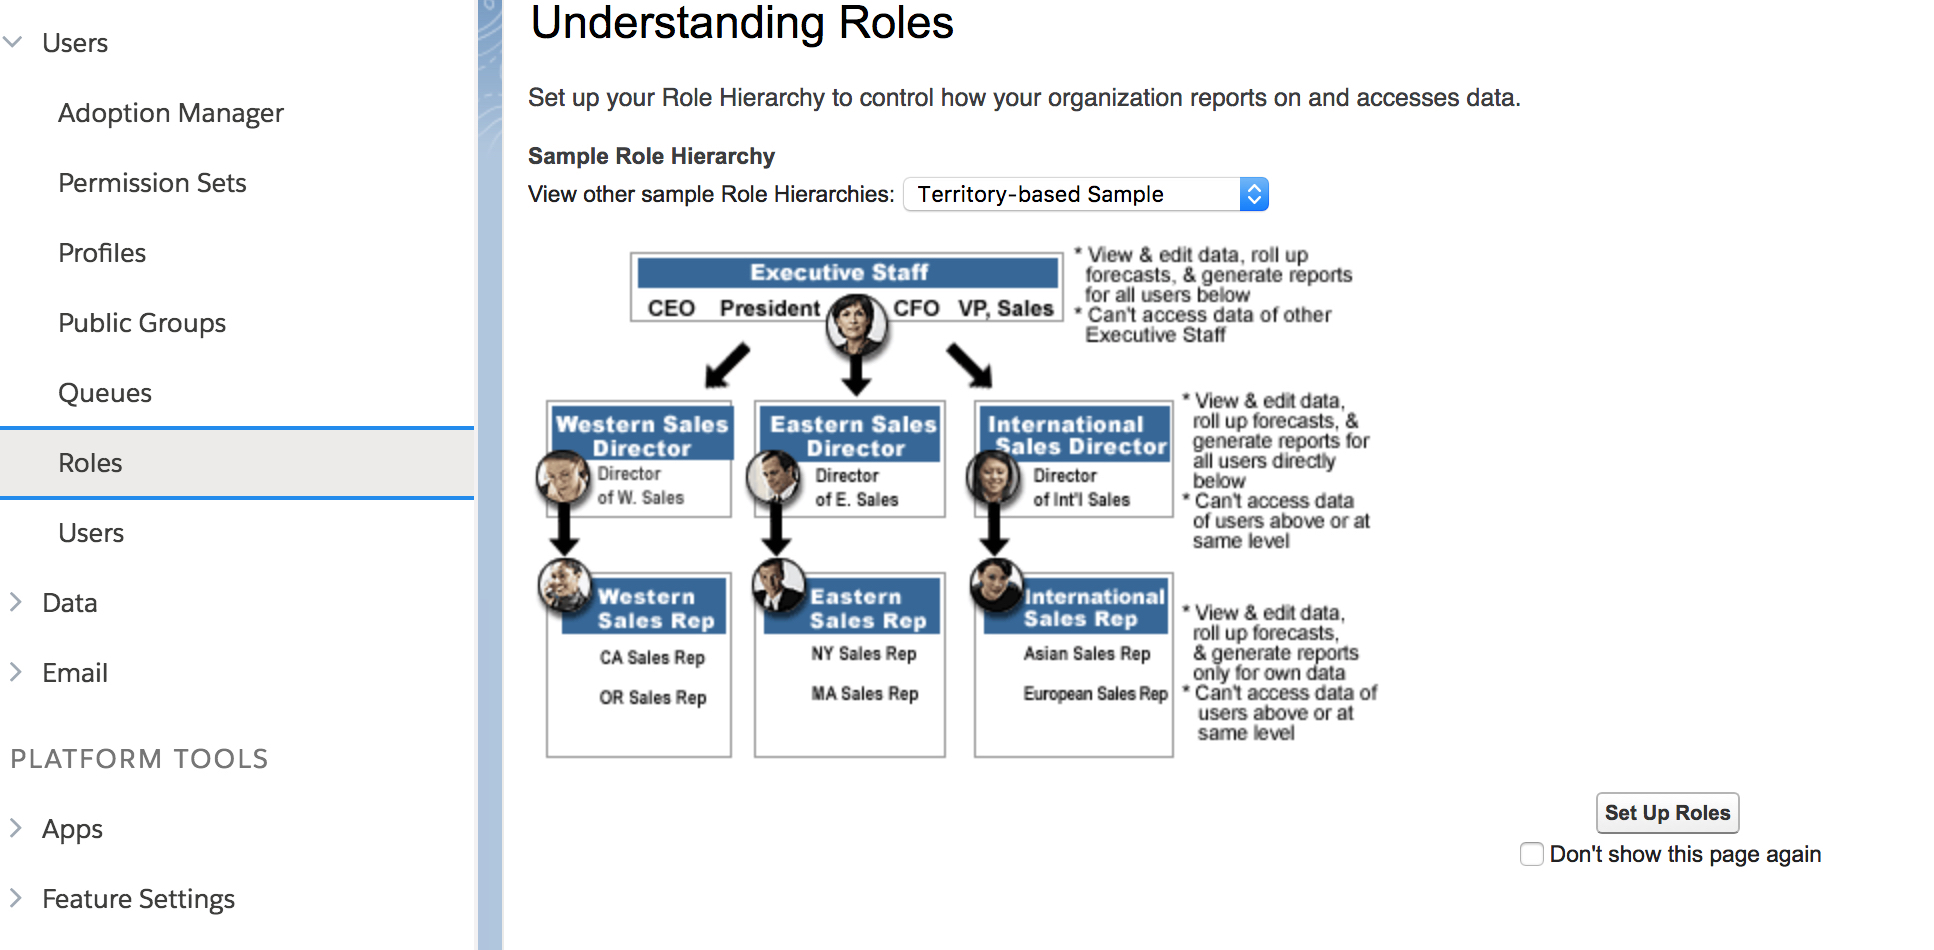
Press the “Set Up Roles” button
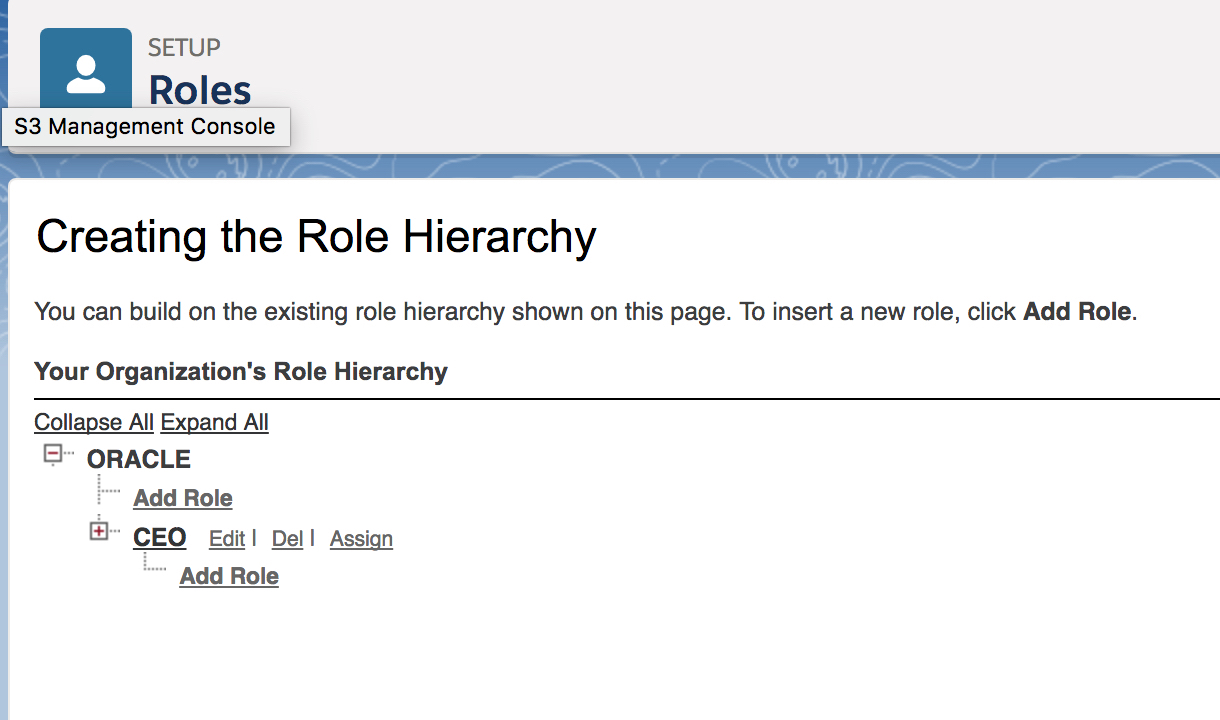
STEP 2.2: Select to create the suggested Salesforce Role Hierarchy.
Select the “Assign” link next to the “CEO” role
STEP 2.3: Add a user to the policy role
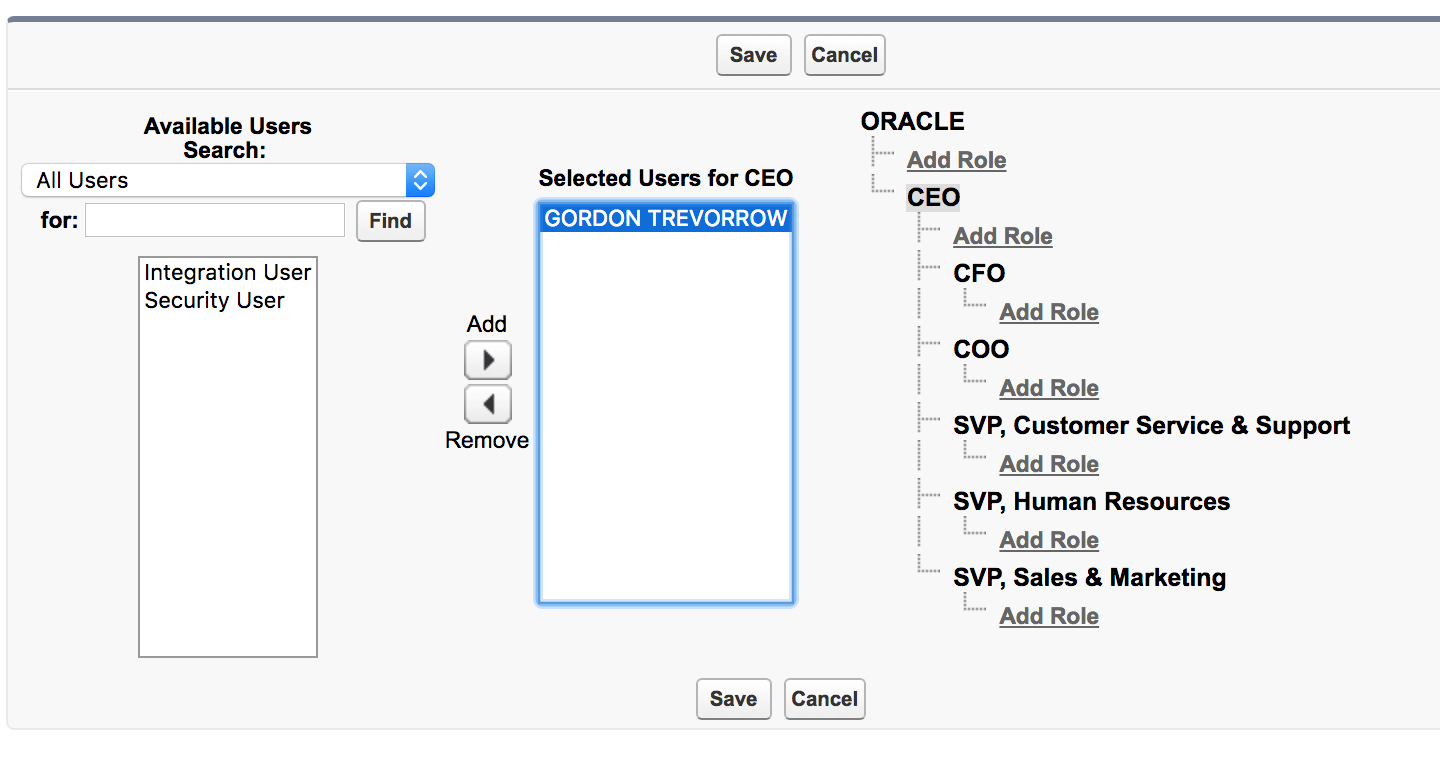
Select the “Add” button to move the user from the “Available Users” list box to the “Selected Users for CEO” list box.
Click the “Save” button
![]() As noted before there is a delay between data collection cycles for the CASB service and the action you perform in Salesforce might not cause the policy alert in CASB to fire immediately but will appear on the next data collection that CASB does to the Salesforce tenant.
As noted before there is a delay between data collection cycles for the CASB service and the action you perform in Salesforce might not cause the policy alert in CASB to fire immediately but will appear on the next data collection that CASB does to the Salesforce tenant.